


Troubleshooting
69
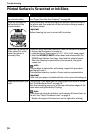
Printing is Blurred/Colors are Wrong/White Streaks appear
note
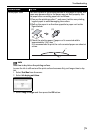
When the color is different from what is displayed on the TV or when it is not printed
with your favorite color
You can adjust the brightness, contrast, color hue when you print a photo.
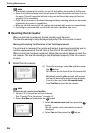
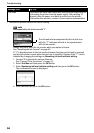
1 Select Tool Box from the menu and then press the button.
2 Select Color adjust and then press the button.
The Color adjust screen is displayed.
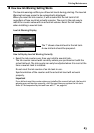
Brightness
........... Press the and button to print a photo brighter and darker.
You can print a photo brighter in the + direction and darker in
the - direction.
Contrast
............... Press the and button to print a photo with higher contrast
and lower contrast.
You can print a photo with higher contrast in the + direction and
lower contrast in the - direction.
Color hue..............Press the
button to enhance the red colors and the
button to enhance the yellow colors at the print.
You can print a photo with the yellow colors enhanced in the Yellow
direction and with the red colors enhanced in the Red direction.
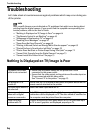
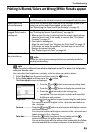
Possible Cause Try This
Ink tank is not installed
If an ink tank is not installed, install it. If an ink tank is installed, push
the PUSH mark on the ink tank to ensure it has snapped firmly into place.
Media type is not
selected properly
Ensure that the media type selected in the Settings screen is the
same type as the media type loaded on the printer.
See “Specifying the Paper and Other Settings” on page 33.
Print head nozzles
clogged/Print head is
misaligned
Print the nozzle check pattern to check for uneven ink output.
See “Printing the Nozzle Check Pattern” on page 56.
• When a specific color is missing from the nozzle check pattern,
clean the print head. If ink supply is uneven: See “Print Head
Cleaning” on page 57.
• Print head is misaligned.
Align the print head. See “Aligning the Print Head” on page 59.
If this does not solve the problem, ink tank may run out of ink.
Replace the vacant ink tank.
See “Replacing an Ink Tank” on page 60.
Media not loaded with
the print-side up
Check that your paper is loaded with the correct print side facing up.
note
Follow the instructions packaged with your specialty media for
loading and handling.
3 Press the and button to move among setting items.
4 Press the and button to display the selected item.
5 Press the button when the settings are
completed. You can now print a photo with specified
brightness and contrast.