


10
4. ADJUSTMENT AND SPECIAL PROCEDURES
4.1 TOOL RECOMMENDATIONS
What you need to service the CANON Professional Puncher-A1:
1. Standard Measure Tools (English as opposed to metric)
a. Open End Ignition Wrench – ¼” (required only for Chad Kit installation)
b. Open the End Wrench 9/16”(for adjustable casters)
c. Nut Driver, 5/16”
d. Nut Driver, ¼” (see note below)
e. Allen Wrench, 3/32” (comes with Chad Control Kit)
f. Allen Wrench, 5/64”
g. Allen Wrench, 9/64”
2. Other recommended tools
a. Needle Nose Pliers (Side Cutters)
b. Wire Cutters
c. Screw Driver, Phillips Head
d. Screw Driver, Flat Head, Small
3. Supply of Wire Tie Wraps
NOTE: A nut driver head of ¼” is the most common size for the barrel of a
Magnetic or interchangeable tip screwdriver.
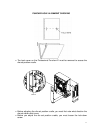
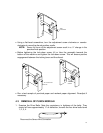
4.2 DIE SET POSITION CRADLE ADJUSTMENT, CENTERING
PUNCHED HOLES
The die set position cradle is set in the factory; however, because of the punched-
hole spacing on the PB die sets, there is a minimal amount of paper on each edge of
the punched paper. The die set position cradle may have to be fine adjusted to
center the punched-hole pattern in the paper.
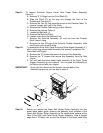
Listed below are the step-by-step instructions to adjust the die set to the proper
position:
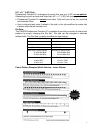
• The punched-hole alignment must be checked on a piece of punched paper. Fold
the punched sheet of paper in half and the punched-holes should be aligned. If the
punched-holes are not aligned, then the die set cradle must be adjusted to align
the punched holes.
NOTE: The paper path is always constant, if the holes are not centered; you
must adjust the die set cradle.