


41
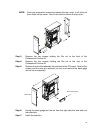
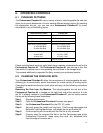
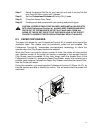
Step 7: Select the desired Die Set for your new job and slide it into the Die Set
slot. Push Die Set in firmly until it latches.
Step 8: Set the Professional Puncher-A1 to the ON (I) mode.
Step 9: Close the Access Door Panel.
Step10: Enable punch and proceed with your printing and punching job.
CAUTION: POSSIBLE PINCH POINT HAZARD. WHEN INSTALLING DIE SETS
INTO YOUR Professional Puncher-A1, ALWAYS KEEP FINGERS AND BODY
PARTS OUT OF THE MACHINE’S DIE SET SLOT AND AWAY FROM ALL
AREAS OF THE DIE SET EXCEPT FOR THE FINGER HOLE IN THE DIE SET.
FAILURE TO OBSERVE THESE PRECAUTIONS MAY RESULT IN INJURY.
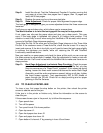
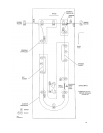
6.3 PAPER CHIP DRAWER
The paper chip drawer for your Professional Puncher-A1 is located at the front of the
machine’s base. The drawer must be periodically pulled out and emptied. The
Professional Puncher-A1 incorporates microprocessor technology to inform the
operator when the Chip Drawer needs to be emptied.
When the Punch has cycled a certain number of times, the printer will stop and the
user interface screen of the printer will display a message to the operator that the
Chip Drawer must be emptied. At this time, simply open the Access Door of the
Professional Puncher-A1, remove the Paper Chip Drawer, empty int’s contents into a
suitable trash container, reinstall the Paper Chip Drawer and close the Access Door.
Now the Printer will restart.
During this operation, you must keep the Professional Puncher-A1 Power On (O), so
that the sensors are able to identify this action. This will ensure that the system will
reset itself.
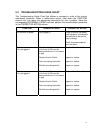
B
BINDER SIDE
A