


1-3
Cisco AS5800 Universal Access Server Dial Shelf Card Guide
78-7097-03 0A
Chapter 1 Replacing or Installing Dial Shelf Cards
Removing a Dial Shelf Card
Removing a Dial Shelf Card
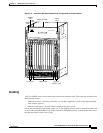
To remove a CT1/CE1 trunk card from the (Cisco 5814) dial shelf, complete the following steps:
Warning
Before opening the chassis, disconnect the telephone network cables to avoid contact
with telephone network voltages. To see translations of the warnings that appear in this
publication, refer to the Regulatory Compliance and Safety Information document that
accompanied this device.
Caution Trunk cards weigh 8 lb (3.6 kg) each. Use two hands when removing or replacing a trunk
card.
Caution To avoid erroneous failure messages, remove or insert only one dial shelf card at a time.
Also, after inserting or removing a dial shelf card, allow at least 15 seconds before
removing or inserting another dial shelf card so that the system can reinitialize and note the
current configuration of all interfaces.
Step 1 Note the slot in which the card is installed. If you are replacing a dial shelf card with a new dial shelf
card of the same type in the same slot, the system software recognizes the new dial shelf card interfaces
and brings them up automatically. No additional configuration is needed.
Step 2 Initialize the software busyout procedure by entering the following console command in privileged
EXEC mode:
busyout shelf-number/slot-number
Step 3 Verify that the yellow maintenance LED on the card lights, which indicates that the card is offline and
ready to be removed.
Step 4 Attach an ESD-preventive wrist strap between you and an unpainted chassis surface.
Caution To prevent ESD damage, handle cards by ejector levers and carrier edges only, and use an
ESD-preventive wrist strap or other grounding device.
Step 5 Disconnect all cables and secure them out of the way, using cable ties, if necessary.
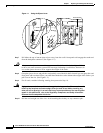
Step 6 Using a No. 2 Phillips screwdriver, loosen the panel fasteners at the top and bottom of the card front
panel. (See Figure 1-1.)