


2-12 Dell Inspiron 3000 Reference and Troubleshooting Guide
This section explains how to reinstall utilities and
drivers on your Dell portable computer with Windows 95.
You may need to use these procedures under the following
conditions:
•
Dell did not install an operating system or other sys-
tem software on your computer.
•
You are reinstalling the version of Windows 95 that
came with your computer, and you need to reinstall
the drivers and utilities that Dell provides.
NOTE: To reinstall the operating system, you need
the Windows 95 installation CD-ROM that came
with your computer.
•
Some of the drivers and/or utilities that came with
your computer are corrupted, and you need to rein-
stall them individually.
•
You have a new hard-disk drive, and you need to
install all of the system software.
In any case, you must use the program diskette set you
made when you received your computer. If you did not
make a program diskette set and you cannot access the
Program Diskette Maker in the Dell Accessories folder,
you can order a program diskette set separately from
Dell. See Chapter 5, “Getting Help,” for more
information.
Reinstalling Video Drivers
Video drivers control features such as screen resolution
and the number of screen colors.
NOTE: If you need to use extended video modes, check
the documentation that came with the application pro-
gram to determine if the drivers are provided. If not,
contact the software manufacturer to get the necessary
drivers.
To reinstall the video drivers, follow these steps:
1. Save your work in all open application programs,
because you will need to restart your computer at
the end of this procedure to complete the
installation.
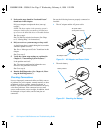
2. Insert the
Video Drivers
diskette into the diskette
drive.
3. Click the Start button, point to Settings, and then
click Control Panel.
The Control Panel window appears.
4. Double-click the Display icon.
The Display Properties window appears.
5. Click the Settings tab.
6. Click the Advanced Properties button.
The Advanced Display Properties window appears.
7. In the Adapter Type box, click the Change...
button.
The Select Device window appears.
8. Click the Have Disk... button.
9. Verify that
A:\
is displayed in the Copy Manu-
facturer’s Files From: box, and then click OK.
10. When the Select Device window appears, verify
that the NeoMagic MagicGraph 128XD option is
highlighted, and then click OK.
The Copying Files window appears. A progress bar
is shown while the driver files are being copied to
your hard-disk drive.
After the drivers are successfully installed, the
Advanced Display Properties window reappears.
11. Click the Close button in the Advanced Display
Properties window.
12. If you have not specified what type of monitor
you use, the Display Properties window appears.
Click Yes if you want to specify an external monitor
now. The Select Device window appears. Select your
monitor manufacturer and model name, and then fol-
low the instructions on your screen.
If you do not want to specify an external monitor
now or if you have already done so, go to step 13.
13. Click the Close button in the Display Properties
window.
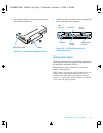
14. Remove the
Video Drivers
diskette from the dis-
kette drive.
15. Restart your computer to activate the drivers.
55899BK1.BK : 55899c21.fm Page 12 Wednesday, February 4, 1998 1:20 PM