


Cards 53
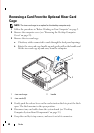
4
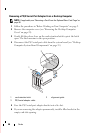
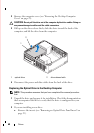
Gently push the release lever on the card retention latch to pivot the latch
open. The latch remains in the open position.
5
If you are installing a new card, remove the filler bracket to create an empty
card-slot opening.
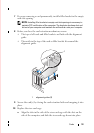
6
If you are replacing a card that is already installed in the computer, remove
the card (see "Removing a PCI or PCI Express Card From a Desktop
Computer" on page 35 or "Removing a PS/2 Serial-Port Adapter From a
Desktop Computer" on page 46).
7
If necessary, disconnect any cables connected to the adapter.
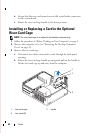
WARNING: To guard against electrical shock, be sure to unplug your computer
from its electrical outlet before installing any cards or adapters.
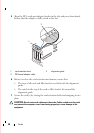
8
Align the card in the slot and press down firmly. Ensure that the adapter is
fully seated in the slot.
9
Before you close the card retention mechanism, ensure:
• The tops of all cards and filler brackets are flush with the alignment
guide.
• The notch in the top of the card or filler bracket fits around the
alignment guide.
10
Secure the card(s) by closing the card retention latch and snapping it into
place.
CAUTION: Do not route card cables over the cards. Cables routed over the cards
can prevent the computer cover from closing properly or cause damage to the
equipment.
11
Connect any card cables to the system board as appropriate (see "Desktop
Computer System Board Components" on page 15).
12
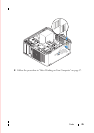
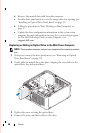
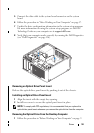
Replace the riser-card cage:
a
Align the tabs in the side of the riser-card cage with the slots on the
side of the computer, and slide the riser-card cage down into place.
b
Ensure the riser-card connectors are fully seated in the connectors on
the system board.
c
Rotate the riser-card cage handle downward to secure it into place.
13
Connect any disconnected cables.
14
Follow the procedure in "After Working on Your Computer" on page 17.