


DXP DVI Pro and DXP HDMI Series • HTML Operation 115
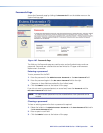
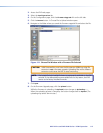
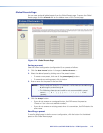
The Set and View Ties screen consists of the following major sections:
• Set & View Ties — Consists of a matrix of input (rows) and output (columns)
selection buttons.
To create a tie using this screen:
1. Move the mouse over the matrix of input and output selection buttons. Click a
button to create a preliminary tie of the input and output associated with that
button (if they are not already tied) or a preliminary untie (if the input and output
are tied). A “P” (for preliminary) appears on the button.
NOTES: • If you lose track of the input and output associated with a specific
button, let the mouse rest over one of the tie buttons for a moment. A
field pops up (as shown in the figure 113 on the previous page) that
identifies the input and output for that button.
• To tie an input to all outputs, click that input number, located at the left
of the matrix.
2. Click the
Take button to make the configuration changes or Cancel button to
abandon the changes.
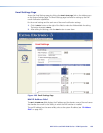
• Input Adjustments — Contains an HDCP Authorization check box for each input.
For the desired input, select this check box to turn on HDCP authorization or clear the
box to turn authorization off. By default, HDCP authorization is on for all inputs.
NOTE: If the source requires HDCP authentication, ensure that HDCP
authorization is set to On (the default).
• Output Adjustments — Contains an
AV Mute button for each output.
To mute or unmute an output:
1. In the Signal Type section, select the signal that you want to mute by clicking the
Video Only, Audio Only, or Video & Audio button. A color fill is added to the
selected signal type button: Video Only is filled with green, Audio Only, red, and
Video & Audio, amber.
2. Click the Mute button to the right of the desired output number. The selected
button label changes to Muted and its background becomes the color of the
signal type button selected in step 1.
To unmute an output, click its Muted button. The button label changes to Mute and
the color fill is removed.
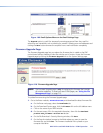
• EDID Configuration — Contains the following:
• Save Output 1 section: If desired, you can save the EDID for the output device
connected to the DXP output 1 (only) as a user-assigned EDID, by clicking one of
the User buttons (numbered User 1 through User 4). After you save the EDID of
Output 1 as a user-assigned EDID, you can select it from the EDID menu for any
input.
• EDID menus: For each input, there is a drop-list of EDIDs (including
user-assigned), from which you can select the resolution and refresh rate to assign
to the input.
(If you select a User Assigned option for which no EDID has been specied, the
default 700p @ 60 Hz is applied to the input.)