


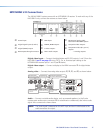

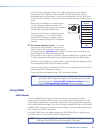


User Loaded EDID – Digital
The EDID of a display connected to the HDMI output of the MTP/HDMI U R receiver (see
on page 17
)
can be read and stored to the digital user loaded spaces 3 or 4 (SIS values
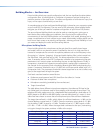
51 and 52, see figure 14). This can be recalled later as the user assigned EDID.
To save the digital output EDID information to the User 3 or User 4 location in the
EDID table:
1. Connect the display to the digital output on the MTP/HDMI U R receiver.
2. Start DSP Configurator, if it is not running already, and connect in the Live mode .
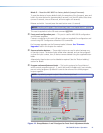
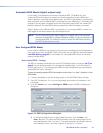
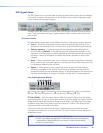
3. From the Tools menu, select Configure EDID to open the EDID Conguration
dialog box (see figure 14).
4. In the Save Digital Output to User Loaded IDs section, click the User 3 or User 4
button. This saves the EDID information from the digital output to the associated
location (User 3 or User 4). The saved resolution and refresh rate are now available as
User 3 and User 4 options in the Inputs 5-8 section.
Importing EDID Data
EDID data les (previously saved as BIN les) can be imported using DSP Congurator
software. This enables the user to use a previously saved file, for example a specific
customized EDID, that has been saved on a PC or laptop. The le is uploaded to one of
the four user loaded spaces, depending on if it is an analog or digital EDID, and then it can
be assigned to the relevant inputs.
To import EDID data to one of the four user loaded spaces:
1. Ensure the PC or laptop has the relevant le on it and is connected to the MLS 608 D.
2. Start DSP Configurator, if it is not running already and connect in the Live mode.
3. From the Tools menu, select Configure EDID to open the EDID Conguration
dialog box (see figure 14).
4. Click the Import button. The import dialog box opens.
5. Select the relevant user loaded button, depending if it is an analog or digital EDID.
6. Browse to where the le (xx.BIN) is located.
7. Select the file and click OK.
Exporting EDID Data
EDID data les can be exported using DSP Congurator software so that the data within
the file can be stored for use on another device, viewed, printed, or examined block by
block for troubleshooting purposes for example, in EDID Manager software.
To export EDID data:
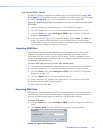
1. From the Tools menu, select Configure EDID. The EDID Conguration dialog box
opens.
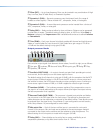
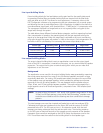
2. Click Export EDID. The Export EDID dialog box opens (see gure below).
Figure 15. Export EDID Dialog Box
MLS 608 D Series • Operation 25