


14 • Chapter 2 Getting Started DMC-2X00
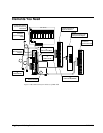
5. Motor Amplifiers.
6. Power Supply for Amplifiers.
7. Brush or Brushless Servo motors with Optical Encoders or stepper motors.
8. PC (Personal Computer - RS232 or USB for DMC-2000 or Ethernet for DMC-2100)
9a. WSDK-16 or WSDK-32 (recommend for first time users.)
or
9b. DMCWIN16, DMCWIN32 or DMCDOS communication software.
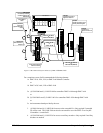
The WSDK software is highly recommended for first time users of the DMC-2x00. It provides step-
by-step instructions for system connection, tuning and analysis.
Installing the DMC-2x00
Installation of a complete, operational DMC-2x00 system consists of 9 steps.
Step 1. Determine overall motor configuration.
Step 2. Install Jumpers on the DMC-2x00.
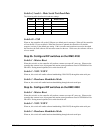
Step 3a. Configure the DIP switches on the DMC-2000.
Step 3b. Configure the DIP switches on the DMC-2100.
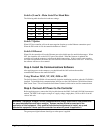
Step 3c. Configure the DIP switches on the DMC-2200
Step 4. Install the communications software.
Step 5. Connect AC power to controller.
Step 6. Establish communications with the Galil Communication Software.
Step 7. Determine the Axes to be used for sinusoidal commutation.
Step 8. Make connections to amplifier and encoder.
Step 9a. Connect standard servo motors.
Step 9b. Connect sinusoidal commutation motors
Step 9c. Connect step motors.
Step 10. Tune the servo system
Step 1. Determine Overall Motor Configuration
Before setting up the motion control system, the user must determine the desired motor configuration.
The DMC-2x00 can control any combination of standard servo motors, sinusoidally commutated
brushless motors, and stepper motors. Other types of actuators, such as hydraulics can also be
controlled, please consult Galil.
The following configuration information is necessary to determine the proper motor configuration:
Standard Servo Motor Operation:
The DMC-2x00 has been setup by the factory for standard servo motor operation providing an analog
command signal of +/- 10V. No hardware or software configuration is required for standard servo
motor operation.