


32
T
T
h
h
e
e
I
I
n
n
i
i
t
t
i
i
a
a
l
l
S
S
e
e
t
t
-
-
U
U
p
p
(
(
I
I
S
S
U
U
)
)
M
M
e
e
n
n
u
u
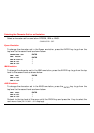
There are three primary headings in the Initial Set Up Menu as shown below. Each primary heading
has one or two levels below it:
1. INITIALIZE
2. ALIGNMENT
3. SENSOR TUNE
E
E
n
n
t
t
e
e
r
r
i
i
n
n
g
g
I
I
n
n
i
i
t
t
i
i
a
a
l
l
S
S
e
e
t
t
-
-
U
U
p
p
M
M
e
e
n
n
u
u
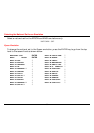
To enter the Initial Set-Up Menu, proceed as follows:
1. Turn off the printer's power.
2. Press and hold the
LINE FEED
and
FF/LOAD
keys.
3. While holding these keys, turn on the printer's power. Shortly, after the power comes
up, the LCD displays the following message:
INITIAL MENU
4. Release the
LINE FEED
and
FF/LOAD
keys. The LCD displays the first menu item:
INITIALIZE
M
M
o
o
v
v
i
i
n
n
g
g
w
w
i
i
t
t
h
h
i
i
n
n
t
t
h
h
e
e
I
I
n
n
i
i
t
t
i
i
a
a
l
l
S
S
e
e
t
t
-
-
U
U
p
p
M
M
e
e
n
n
u
u
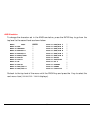
1. Press the
ENTER
key to go into the next Front1 level of the menu.
2. Use the ↑ or the ↓ keys to scroll within a level as well as to change parameter value
display at the selection level.
3. Press the
ENTER
key to save selections at the selection level (SAVING CHANGE displays).
The selection level is apparent whenever the LCD is flashing on and off.
4. Use the
PRIOR
key to go to the next higher level as well as to not save a selection at the
selection level.