


From the Windows control panel, in the Cameras and Scanner folder (located inside the Hardware
and Sound folder for Windows Vista and Windows 7), double-click the product icon. This opens the
standard Microsoft WIA Wizard, which enables you to scan to a file.
Scan by using optical character recognition (OCR) software
To import scanned text into your preferred word-processing program for editing, open the HP Scan
software and select the shortcut named Save as Editable Text (OCR).
You can also use third-party OCR software. The Readiris Pro OCR program is included on a separate
CD that shipped with the product. To use the Readiris Pro program, install it from the appropriate
software CD, and then follow the instructions in the online Help.
Cancel a scan
To cancel a scan job, use one of the following procedures.
●
On the product control panel, touch the Cancel
button.
●
Select and delete the job from the status bar after the time-out occurs.
Scan settings
Scanner resolution and color
If you are printing a scanned image, and the quality is not what you expected, you might have
selected a resolution or color setting in the scanner software that does not match your needs.
Resolution and color affect the following qualities of scanned images:
●
Clarity
●
Texture of gradations (smooth or rough)
●
Scan time
●
File size
Scanning resolution is measured in pixels per inch (ppi).
NOTE: Scanning ppi levels are not interchangeable with printing dpi (dots per inch) levels.
Color, grayscale, and black and white define the number of colors possible. You can adjust the
scanner hardware resolution to up to 600 ppi.
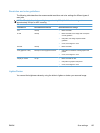
The resolution and color guidelines table lists simple tips that you can follow to meet your scanning
needs.
NOTE: Setting the resolution and color to a higher values can create large files on disk and slow the
scanning process. Before setting the resolution and color, determine how you are going to use the
scanned image.
124 Chapter 11 Scan ENWW