


NOTE: Normally, a little oil remains in the fuser slot in which
the oil bottle rests, and the spout of the oil bottle has a seal to
prevent oil from spilling while you remove or install a bottle
on the pin in the fuser slot. However, if oil accidentally spills
beyond that slot, use a clean, dry, lint-free cloth or some cotton
swabs to wipe up the excess.
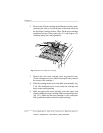
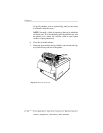
11. Grasp the top tab on the oil bottle, then lift the bottle out of
the printer, and discard it.
NOTE: If you are replacing an oil bottle after a move, remove
and discard the wadded paper towel from the place normally
occupied by the oil bottle.
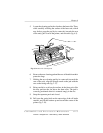
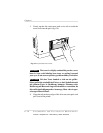
12. Hold the new oil bottle, spout end down, bottle label toward
the front of the printer, over its slot in the fuser unit (fig. 2.19).
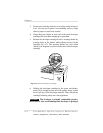
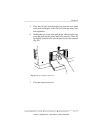
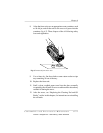
13. Lower the bottle into place, making sure the spout on the
bottom aligns with the pin in the fuser slot. The bottle is
positioned correctly when it fits snugly into the slot and is
flush with the fuser unit.
14. Close and latch the oil bottle retainer.
15. Close the paper exit unit.
16. Replace the printer’s top cover.
17. Turn on the main power switch.
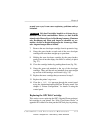
Replacing the Waste Toner Pack
This section covers replacing the waste toner pack in your printer.
The pack collects excess toner from the printing process and should
be replaced when the window on the control panel displays the
message CHECK WASTE TONER.
Illustrations for many of the steps described in this section are in
chapter 2, “Initial Printer Setup.”
Chapter 6
6-14 Consumables and Preventative Maintenance
EDNord - Istedgade 37A - 9000 Aalborg - telefon 96333500