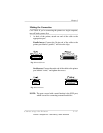
2. At the computer, attach the other end of the cable to
appropriate port. (The parallel port is female, and the serial
port is male.)
3. Turn on the printer and the computer.
4. Test communication.
Parallel users: You can do this by sending a file from one of
your applications or you can see “Testing Parallel
Communication,” later in this chapter.
Serial users: You can do this by sending a file from one of
your applications or you can see “Testing Serial
Communication,” later in this chapter.
5. See “PC Printing Software,” below to finish connecting the
printer.
PC Printing Software
If you’re replacing a color PostScript printer, you can probably start
printing now with the printing software already in place. You can
refer to your application documentation for instructions on sending
documents to the printer.
However, if you want to be able to use all your printer’s special
features (like Q
COLOR automatic color control technology, media
size and type selection, and collation), or if you’ve never printed
to a color PostScript printer before, we recommend you take a few
minutes to make sure you have the following printing software
installed:
■ PS Executive Series Utilities
■ A color PostScript printer driver
Chapter 3
3-12 Connecting the Printer
EDNord - Istedgade 37A - 9000 Aalborg - telefon 96333500


