


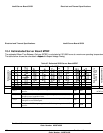
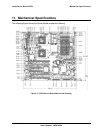


Intel® Server Board SDS2 Jumpers
Revision 1.2
Order Number: A85874-002
93
2. Power off the system, unplug the power cord, and remove the chassis panel.
3. Add a jumper on CN42 pins 9-10 (BIOS Recovery).
4. Insert the BIOS Recovery floppy diskette into the disk drive.
5. Reinstall the chassis panel; plug in the power cord(s), and power on the system.
6. The screen will remain blank while the BIOS Recovery is performed. At the end of the
BIOS Recovery, two high-pitched beeps will sound and the floppy drive access light will
turn off. The BIOS Recovery may take several minutes to complete. When the BIOS
Recovery is complete, it is safe to power off the system.
7. Power off the system, unplug the power cord(s), and remove the chassis panel.
8. Remove the BIOS Recovery jumper from CN42 pins 9-10.
9. Replace the chassis panel; plug in the power cord(s), and power on the system.
9.2.3 Performing BMC Force Update
In the event of a release of an updated BMC Firmware, the following procedure may be used to
update the Firmware.
1. Prepare a bootable floppy diskette containing the updated BMC firmware files for the
SDS2 Server Board obtained from Intel’s web sites.
2. Power off the system, unplug the power cord, and remove the chassis panel.
3. Add a jumper on CN49 pins 1-2 (BMC Force Update).
4. Insert the BMC Firmware floppy diskette into the disk drive.
5. Reinstall the chassis panel; plug in the power cord(s), and power on the system.
6. If any POST errors occur, press F1 to continue. BMC Firmware update may take
several minutes to complete. When the BMC Firmware update is complete, it is safe
to power off the system.
7. Power off the system, unplug the power cord(s), and remove the chassis panel.
8. Remove the BMC Force Update jumper from CN49 pins 1-2.
9. Replace the chassis panel; plug in the power cord(s), and power on the system.
Note: The instructions for BMC Force Update are general guideline. Please follow the
specific instructions described in the release notes.