


18 007-4857-002
1: System Installation
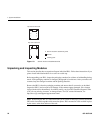
Unpacking and Installing the Tall Rack
Warning: In its maximum configuration, a (42U) tall rack system weighs approximately
1,450 lb (658 kg). Use caution when you unpack and move this rack. A pallet jack is needed
to move the rack prior to unpacking. Ensure that the rack remains on a level surface and
that the rack weight remains evenly distributed across the four casters.
To unpack a tall rack, you will need the following tools:
• Extension, 6-inch (15.3 cm), 3/8-in. (13mm) drive
• 13-mm standard 3/8-in. drive socket
• Ratchet, reversible, 3/8-in. (13mm) drive
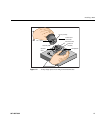
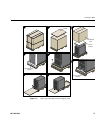
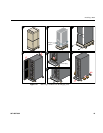
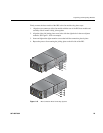
See Figure 1-6 as you follow these steps; the numbered illustrations correspond to the numbered
steps. Ensure that the temperature of the rack is acclimated to the installation environment and that
the system crate is stable, and in an upright position.
1. Use a sharp cutting tool to remove the bands that secure the cardboard crate, then remove the
outer packing materials.
2. Remove the cover bag and bungee cushion from the rack.
3. Locate and remove the 8 bolts that secure the wooden frame pieces to the base.
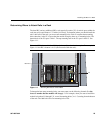
4. The rack’s front and rear doors must be removed before you can remove the rack’s shipping
runners.
5. Remove and discard the foam plugs from either end of the rack’s base. At this time you will
need to place a pallet jack under the rack and lift it until the shipping runners are clear of the
floor.
6. Undo and remove the two bolts on the shipping runners at either end of the rack and set the
runners aside.
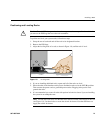
7. Use the pallet jack to lower the rack to the floor and use at least two people to roll the rack to
the installation site.
Warning: Personal injury and system damage could result if the rack becomes
unbalanced or gains too much momentum when rolled.
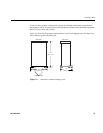
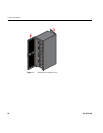
Reattach the doors to the front and rear before you move the rack to its designated location (see
Figure 1-7 on page 20).