


■ An Ethernet cable (provided)
■ If you are performing the initial configuration with the CLI, collect the following
equipment:
■ A management device, such as a PC or laptop, with a serial port and an
asynchronous terminal application (such as Microsoft Windows
Hyperterminal)
■ An RJ-45 to DB-9 serial port adapter (provided)
■ An Ethernet cable (provided)
■ For a remote connection, two dial-up modems
■ For a remote modem connection, a DB-9 female to DB-25 male adapter, or
other adapter appropriate for your modem (not provided)
Connecting to a Services Router
You can connect to the Services Router using the J-Web or CLI interface.
This section contains the following topics:
■ Connecting to the J-Web Interface on page 135
■ Connecting to the CLI Locally on page 137
■ Connecting to the CLI Remotely on page 139
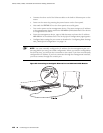
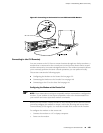
Connecting to the J-Web Interface
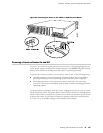
If you plan to use the J-Web interface to configure the Services Router, you must
connect through one of the built-in Ethernet management ports, as shown in
Figure 64 on page 136 and Figure 65 on page 137.
When the Services Router is powered on for the first time, the system looks for a
DHCP server, and if it does not find one, it assigns an IP address within the
192.168.1.0/24 subnetwork to any devices connected to it.
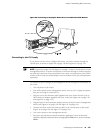
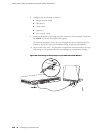
To connect to the J-Web interface through port 0 on the router (see Figure 64 on page
136 and Figure 65 on page 137):
1. On the management device, such as a PC or laptop, you use to access the J-Web
interface, verify that the address of the port that you connect to the router is set
to one of the following:
■
An Ethernet address on the 192.168.1/24 subnetwork other than
192.168.1.1
■ An Ethernet address from a DHCP server
2. Turn off the power to the management device.
3. Plug one end of the Ethernet cable into the Ethernet port on the management
device.
Connecting to a Services Router ■ 135
Chapter 7: Establishing Basic Connectivity