


a. Attach an electrostatic discharge (ESD) grounding strap to your bare wrist
and connect the strap to the ESD point on the chassis, or to an outside ESD
point if the router is disconnected from earth ground. For more information
about ESD, see “Preventing Electrostatic Discharge Damage” on page 249.
b. Press and release the power button to power off the Services Router. Wait
for the POWER LED to turn off.
c. Unplug the power cord or cable from the power source receptacle.
d. Remove the screws from the sides and the top of the chassis, and slide the
cover off the chassis.
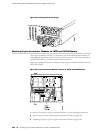
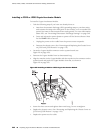
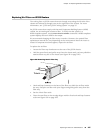
2. Locate the Crypto Module socket on the system board (see Figure 96 on page 204).
The socket is tipped up at an angle when empty.
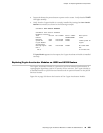
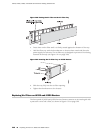
3. If a screw and standoff washer are already in place (see Figure 97 on page 205),
remove them.
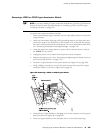
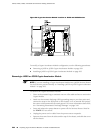
4. Remove the Crypto Module from its electrostatic bag and insert it into the socket.
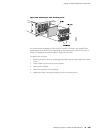
5. Push the Crypto Module down flat against the main board until the release clips
click into place, as shown in Figure 98 on page 205.
6. Insert the standoff washer under the Crypto Module.
7. Insert the screw and tighten it until snug. Do not overtighten.
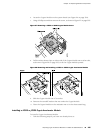
8. Slide the cover onto the router, and replace and tighten the cover screws.
9. Replace the power cord or cable.
10.
Press and release the power button to power on the router. Verify that the POWER
LED lights steadily.
11.
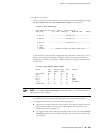
Verify that the Crypto Module is correctly installed by issuing the show chassis
hardware command, as shown in the following example:
user@host> show chassis hardware
Hardware inventory:
Item Version Part number Serial number Description
Chassis JN1086A34ADA J4350
Midplane REV 00 710-014594
System IO REV 00 710-012315 JX350 System IO
Routing Engine REV 00 710-012149 RE-J4350-2540
Crypto Module Crypto
acceleration
FPC 0 FPC
PIC 0 4x GE Base PIC
If Crypto Module appears in the output, the Crypto Accelerator Module is installed
correctly.
206 ■ Replacing Crypto Accelerator Modules on J4350 and J6350 Routers
J2320, J2350, J4350, and J6350 Services Router Getting Started Guide