


Replace Power Sys
tem Components
1. Attach an electrostatic discharge (ESD) grounding strap to your bare wrist and connect
the strap to one of the ESD points on the chassis. For more information about ESD, see
“Prevent Elec
trostatic Discharge Damage” on page 134.
2. Press the powe
r switch for the power supply (located on the power supply faceplate) to
the OFF (O) position.
If you are po
wer cycling the power supply rather than shutting it off
for a time, wait at l east 60 seconds after turning it off before turning it
back on. If y
ou need to power it off again, wait for at least 60 seconds
after powering it on.
3. Shut off the power flowing to the power supply from the external power source, so that
the voltage across the leads of the power cables is 0 V. Ensure that there is no chance
that the cable lea
ds might become active during the procedure.
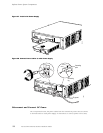
4. Usinga3-mmflat-
blade screwdriver, turn the screw on each quick-connect terminal
counter-clockwise to loosen the terminal connector from around the cable.
5. Remove the cables from the terminal connectors an d from the hook located on the
faceplate to the right of the quick-connect terminals.
6. Loosen the thumbscrew at each end of the power supply faceplate, using a Phillips
screwdriver if n
ecessary. Unscrew both thumbscrews simultaneously and at about the
same rate (unscrewing the two screws a lter nately or at very different rates can cause
the power supply to become lodged in the slot, making it d ifficu lt to turn t he screws).
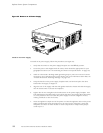
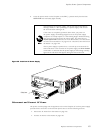
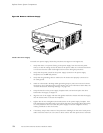
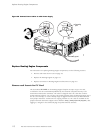
7. Grasp the handle on the power supply faceplate and pull firmly to slide the unit
about halfway o
ut of the chassis.
8. Place one hand
under the power su pply to support it, then slide it completely out of
the chassis.
Replace Hardware Components
105