


Install the Chass
is into the Rack
• Place the rack in its permanent location, allowing adequate clearance for airflow
and maintenance, and secure it to the building structure. For details, see “Rack
Requirements
” on page 37.
• Read the information in “Installation Safety Guidelines and Warnings” on page 146,
with particul
ar attention to “ Chassis Lifting Guidelines” on page 146.
• Remove the router from the shipping carton, as described in “Unpack the Router”
on page 55.
Then, perform the following procedures to install th e router:
1. If you a re front-mounting the router, move the mounting ears on the chassis from the
center-mounting position to the front-mounting position, and install the support shelf.
For instruct
ions, see “Choose Front or Center Mounting” on page 57.
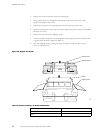
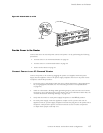
2. Position th
e chassis at the appropriate height in the rack:
• If using a me
chanical lift, load the router onto the lift, making sure it rests securely
on the lift platform. Use the lift to raise the chassis to the correct height.
• If not using
a mechanical lift, have one person stand behind the router and another
person in front. Grasp the chassis, lift it, and position it at the correct height. Have
athirdpersonreadytoinstallthemountingscrews.
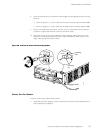
3. Align the bottom hole in both mounting ears with a hole in each rack rail, making
sure the chassis is level.
4. Install one of the mounting screws provided (in the accessory box shipped wi th the
router) i
nto each of the two aligned holes. Use a Phillips screwdriver to tighten the
screws.
5. Install a mounting screw into the top hole in each mounting ear.
6. Verify that the router is level.
7. If using a mechanical lift, move it away from the rack.
8. To continue the installation, proceed to “Connect the Router and Perform Initial
Configuration” on page 61.
60 M5 and M10 Internet Routers Hardware Guide