


9: Analog Input, Output and Relay Settings
xSenso User Guide 54
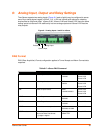
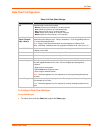
Table 9-3 DAQ Settings
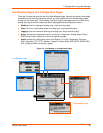
To Configure DAQ Settings
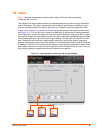
Using Web Manager
To configure DAQ Settings, go to the Setup tab/page and click DAQ Format in the menu.
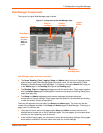
Using the CLI
To enter the DAQ Settings command level:
enable -> config -> analog -> daqformat
Using XML
Include in your file: <configgroup name=”daq format”>
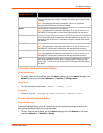
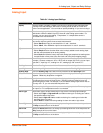
AOUT2 <value> Writes Output 2 value.
Value must have float format:
[+/-]<digits>.<digits>
AOUT2 +10.0\r
SUBMITTED
xSenso 21A2
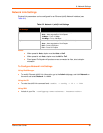
ROUT1 Reads Relay 1 current setting. ROUT1\r
+1
xSenso 21R2
ROUT2 Reads Relay 2 current setting. ROUT2\r
+0
xSenso 21R2
ROUT* Reads all current relay settings. ROUT*\r
+1 +0
xSenso 21R2
ROUT1 <0, 1, or 2> Write Relay 1 setting:
0 to turn off relay
1 to turn on relay
2 to reset latched relay
ROUT1 1\r
SUBMITTED
xSenso 21R2
ROUT2 <0, 1, or 2> Write Relay 2 setting:
0 to turn off relay
1 to turn on relay
2 to reset latched relay
ROUT2 0\r
SUBMITTED
xSenso 21R2
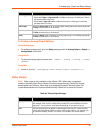
DAQ Settings Description
Time Type Select Uptime or Clock time type. If Timestamp is enabled, this selection applies.
Uptime represents the time since the device has powered up. To use Clock time,
first go to Clock settings to set it up.
Timestamp Select whether to enable a time stamp to be placed before each sample value.
Identifier Select whether to enable an alphanumeric identifier to be placed before each
sample value and optional timestamp.
Units Select whether ot enable the applicable unit to be placed after each sample value.
End Character Enter an end character to place this character at the tail end of sample strings. You
may also delete field contents to remove the end character.
Command (continued) Description Example xSenso Model