


110
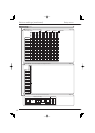
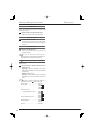
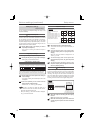
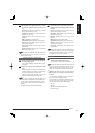
Sequential display
Example
12
2 seconds
later
2 seconds
later
2 seconds
later
The screen display automatically switches.
2 seconds
later
34
56
78
910
11 12
13 14
15 16
When you make settings as
follows:
Split 4a: Camera numbers 1 to 4
Split 4b: Camera numbers 5 to 8
Split 4c: Camera numbers 9 to 12
Split 4d: Camera numbers 13 to 16
Sequential display: 4abcd
Display interval: 2 seconds
Step
1 Select [Setting] next to [Sequential display].
•
The screen for setting the sequential display is
displayed.
Step
2
To set the display order in the single-screen
sequential display mode, set [Single sequential
display].
•
When you click on the number, it changes from 1 to
16 and [- -] in order.
Step
3 To set the display order in the split-screen
sequential display mode, set [Split sequential
display].
Step
4 To set the display switching interval in the
sequential display mode, designate the desired
interval in [Display interval].
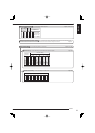
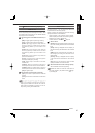
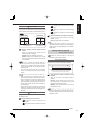
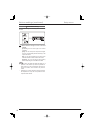
Alarm display
When an alarm signal is input, the single screen or 4-split
screen is displayed according to the pre-designated
selection. When another alarm signal is input during alarm
recording, the images from the cameras recorded upon
input of the latest alarm signal are displayed on the single
screen or 4-split screen. After the completion of the alarm
recording, the screen returns to the original display mode.
Example
Displayed on the
9-split screen
A trigger for alarm recording
selected by the recording setting is input.
During
normal recording
During
alarm recording
The screen automatically
switches to either the single
screen display or 4-split
screen display according to
the pre-determined selection.
Step
1 Select the output for activating the alarm display
function.
[Off]: Alarm display function is disabled.
Step
2 Select the screen display mode to be used when
an alarm signal is input for each of the connected
sensors.
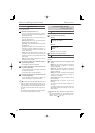
Multiplexer settings
<Multiplexer setting>
You can confi gure the multiplexer settings for Output A and
Output B individually.
Output A/Output B
You can set the camera numbers displayed on the split
screen on the monitor connected to OUTPUT A or OUTPUT
B. (The settings of Output A are applied to OUTPUT A,
and those of Output B to OUTPUT B.) You can also make
sequential display settings. Sequential display is a function
to automatically switch the displayed images from the
selected cameras at constant intervals.
Step
1 Select [Setting] next to the output you want to
set (Output A or Output B).
•
The screen for setting the selected output is
displayed.
Copy Output A settings
You can copy the settings of Output A to Output B.
Step
1 Select [Execute] next to [Copy Output A settings].
•
Select [Yes] on a confi rmation screen.
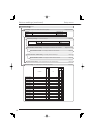
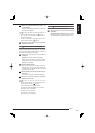
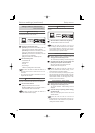
4-split screen to 16-split screen
4-split screen 9-split screen
13-split screen 16-split screen
10-split screen
Set the camera numbers to be displayed on each split screen.
You can select different cameras for Output A and Output B.
Step
1 Select [Setting] next to the split screen mode you
want to change.
•
The screen for setting the selected split screen mode
is displayed.
Step
2 Left-click repeatedly on the number until the
desired camera number appears.
•
Numbers from 1 to 16 and [- -] are displayed.
Notice
• You cannot set more than one same camera number
within the same split screen mode.
• When you select [- -], the camera number is displayed
as [--] on the normal screen.
Various settings (continued)
Setup menu