


60
Emergency recording settings
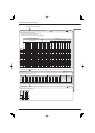
<EMR recording>
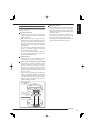
You can make settings for emergency recording. When the
EMERGENCY terminal is grounded by the alarm sensor
while both of the MAIN switch on the rear panel and the
POWER button on the front panel of the recorder are ON,
the recorder automatically starts emergency recording,
overriding the other operations even though it is in the stop
mode or it is performing timer recording.
Notice
• The recorder does not perform emergency recording
when the MAIN switch or the POWER button is OFF
or it is in the timer recording stand-by mode.
• You cannot change the settings made on the <EMR
recording> screen during normal recording or alarm
recording. To change the settings during normal
recording, stop recording. During alarm recording,
when you set [Alarm input] on the <Recording
settings> screen (
page 65) to [Off], receipt of
alarm inputs is prohibited for 5 minutes. Stop recording
during this period and change the emergency
recording settings.
Step
1 Press the SET UP button on the front panel of
the recorder or left-click the mouse.
or
•
<Main menu> is displayed.
Step
2 Select [Recording setting].
Recording setting
•
The <Recording setting> screen is displayed.
Step
3 Select [Setting] next to [Manual setting].
Setting
•
The <Recording settings> screen is displayed.
Step
4 Select [Setting] next to [EMR recording].
Setting
•
The <EMR recording> screen is displayed.
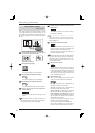
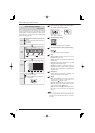
Step
5 Select the picture size for emergency recording
and select [Execute].
[4CIF]: 704x576. The maximum FPS rate is 100.
[2CIF]: 704x288. The maximum FPS rate is 200.
[CIF]: 352x288. The maximum FPS rate is 400.
Notice
• When you change the picture size, the FPS rate is
initialized.
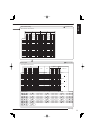
Step
6 Select cameras used for emergency recording.
•
The cameras selected in the [Recording cameras]
area are used for recording.
Step
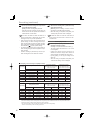
7 Set the FPS for emergency recording.
Tips
• When the sum of each FPS is around the following
values, [Total FPS] is displayed in red and an error
message appears. In this case, decrease the FPS.
When the picture size is set to [4CIF] ...100 FPS
When the picture size is set to [2CIF] ...200 FPS
When the picture size is set to [CIF]
........400 FPS
Step
8 Set the pre-emergency recording time in [Pre-
alarm time].
[0 Sec]: Pre-emergency recording is not performed.
•
Note that the actual pre-emergency recording time
may become shorter than the specifi ed time because
of HDD malfunction or other failure.
Step
9 Set the emergency recording time in [Post-alarm
time].
[Manual]: Emergency recording continues until the
grounding of the EMERGENCY terminal ceases.
Notice
• Ensure that the Pre-alarm time is shorter than the
Post-alarm time.
Recording (continued)