


62
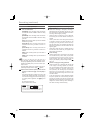
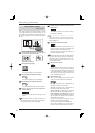
Motion detection settings
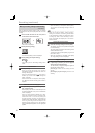
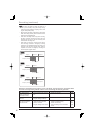
<Motion detection>
Based on the motion detection conditions, the recorder
starts alarm recording when it detects variation in motion
in the image captured by the connected camera. You can
set 2 patterns of motion detection conditions and they can
be switched according to the timer program setting. (MD-A/
MD-B)
Alarm recording
starts.
Alarm recording
starts.
Variation in motion
is detected.
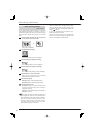
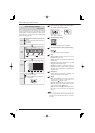
Step
1 Press the SET UP button on the front panel of
the recorder or left-click the mouse.
or
•
<Main menu> is displayed.
Step
2 Select [Recording setting].
Recording setting
•
The <Recording setting> screen is displayed.
Step
3 Select [Setting] next to [Manual setting].
Setting
•
The <Recording settings> screen is displayed.
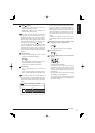
Step
4 Select [Setting] next to [Motion detection].
Setting
•
The <Motion detection setting> screen is displayed.
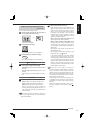
Step
5 Select a camera used for motion detection in
[Camera selection].
1
•
You can make motion detection settings for each
camera.
Notice
• The motion detection function does not work while the
Motion detection setting screen is displayed.
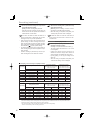
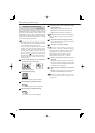
Step
6 Set the detection sensitivity to variation in the
loaded image.
High
•
The detection sensitivity has 5 levels according to
the variation in brightness.
Tips
• When the sensitivity is set to [High], the motion
detection function may detect even flickering of the
fl uorescent light, etc.
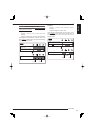
Step
7 Set the motion detection threshold.
005
•
Set the motion detection threshold, which is the
minimum number of active cells in the detection area
that show variation to be detected as motion.
•
Variation occurring in the active cells exceeding the
threshold is detected as motion.
Notice
• You can set the number of active cells in the detection
area at the maximum in [MD threshold]. When you set
a value exceeding that number, it turns to red. In this
case, decrease the value.
Step
8 Set the detection interval.
0.5sec
•
You can select the detection interval. By setting the
detection interval, you can set the motion detection
to work appropriately depending on the motion speed
of the monitored object. For effective detection, set
the interval long for objects that move slowly and set
it short for objects that move fast.
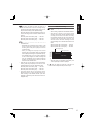
Step
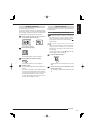
9 Set the detection area.
•
When you select [Setting] next to [Mask set], the
screen for setting the detection area is displayed.
Setting
[All area]: The setting screen is displayed with all
the cells in the detection area set active.
[No area]: The setting screen is displayed with all
the cells in the detection area set inactive.
[User A], [User B]: The setting screen is displayed
with the current detection area setting maintained.
[Copy Setting B], [Copy Setting A]: The setting
screen is displayed with the detection area setting of
the other pattern. The settings made in this step are
saved as [User A] or [User B].
•
Display the desired setting pattern and select
[Execute]. The setting screen is displayed.
•
You can set any of 506 cells in the detection area.
•
Active cells are indicated in red, inactive cells are
indicated in blue, and cells being set are colorless.
Recording (continued)