


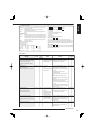


136
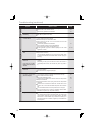
Error indications (continued)
Call-out
signal
output*1
Page
80-83
80-83
80-83
-
-
113
Display
Remedy
Code
Cause
LOG3500*5
LOG7500*6
LOG3600*5
LOG7600*6
LOG3707*5
LOG7707*6
LOG3708
LOG3705
LOG3706
None
None
None
None
None
None
Normal
Normal
Normal
Normal
Normal
Normal
Copy stopped because the copy source
data were overwritten.
Archive stopped because the copy source
data were overwritten.
Copy source data are about to be
overwritten.
Stop recording if you want to continue
copying.
Archive source data are about to be
overwritten.
Stop recording if you want to continue
archive.
Copy HDD error
Cannot copy the data.
Check the copy destination HDD.
Archive HDD error
Cannot archive the data.
Check the archive destination HDD.
DVD/CD drive was not found.
Not connected or unusable.
Connect a proper DVD/CD drive.
No USB memory was found.
No USB memory or unusable memory is
inserted. Use proper USB memory and
connect it correctly.
Menu data cannot be read out.
· The data being copied
or archived are
overwritten.
· The data being copied
or archived are about to
be overwritten.
· The copy/archive
destination HDD is not
found.
· There is no free space
left in the copy/archive
destination HDD.
· The DVD/CD drive is not
connected yet or a drive
of wrong type is
connected.
· No USB memory is
inserted for copying or a
USB memory of wrong
type is inserted.
· The menu data cannot
be read out.
· To continue copying/archiving, stop
recording.
· Press the WARNING RESET button on the
front panel or click the [X] button on the
information screen to clear the warning.
· To continue copying/archiving, stop
recording.
· To continue recording, stop
copying/archiving.
· Press the WARNING RESET button on the
front panel or click the [X] button on the
information screen to clear the warning.
· Press the
WARNING RESET
button on the
front panel or click the [X] button on the
information screen to clear the warning.
· Press the
WARNING RESET
button on the
front panel or click the [X] button on the
information screen to clear the warning.
· Press the
WARNING RESET
button on the
front panel or click the [X] button on the
information screen to clear the warning.
· Press the WARNING RESET button on the
front panel or click the [X] button on the
information screen to clear the warning.
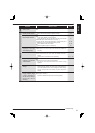
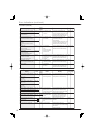
Warning
level*2
Call-out
signal
output*1
Page
105
40, 105
105
-
-
Display
Remedy
Code
Cause
LOG1200
LOG1201
LOG1202
LOG7200
LOG1100*4
LOG1101*4
LOG1102
LOG3100
LOG7100
LOG56 *8
LOG57 *8
LOG6500
Selectable
Selectable
None
Selectable
Selectable
Selectable
Normal
Normal
Normal
Minor
Minor
Remaining capacity of HDD (Normal) is
running short.
Remain **%*3
Remaining capacity of HDD (Alarm) is
running short.
Remain **%*3
Remaining capacity of HDD (EMR) is
running short.
Remain **%*3
Remaining capacity of HDD (Archive) is
running short.
Remain **%*3
Remaining capacity of HDD (Normal) is
0%.
Remaining capacity of HDD (Alarm) is 0%.
Remaining capacity of HDD (EMR) is 0%.
Remaining capacity of HDD (Copy) is 0%.
Remaining capacity of HDD (Archive) is
0%.
Recorder skipped the defect area and
resumed recording.
Recorder resumed recording to the next
HDD.
Error was found in the external HDD.
Check the HDD system configuration.
· The remaining capacity
of the HDD reaches the
value set by [Call-out].
· The free space in the
HDD runs out with
[Call-out] set to 0%.
(It is
not output when the repeat
recording is enabled.)
· The free space in the
copy or archive device
runs out.
· A temporary failure or
malfunction occurs in the
HDD.
· The external HDD is
reset.
· Press the WARNING RESET button on the
front panel or click the [X] button on the
warning indication to clear the warning.
· Press the WARNING RESET button on the
front panel or click the [X] button on the
warning indication to clear the warning.
· When the warning is cleared, the recorder
overwrites data from the oldest.
· Press the WARNING RESET button on the
front panel or click the [X] button on the
warning indication to clear the warning.
· Replace the medium with a new one.
· Check whether the HDD has no
malfunction.
· Check whether the HDD has no
malfunction.
· Turn off the power of the recorder and then
turn it back on.
· Check the connection.
Warning
level*2
<Information> (continued)
<Warning>