


73
Search
ENGLISH
Tips
• When you press the PAUSE/JUMP TO END button
while the playback is stopped, images around the end
of the latest recorded data are played back in the still
image playback mode. (
Page 78) (The point to be
searched is different from that searched by the End
point search.)
• The range of playback may become narrower than
that defi ned by the recording start and end times being
displayed.
• When the <Search menu> is displayed during
playback, playback stops.
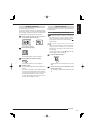
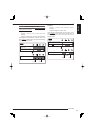
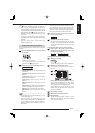
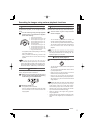
Setting the searching conditions
You can designate a device, camera, and time as search
conditions.
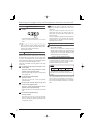
Step
1 Press the SEARCH button on the front panel of
the recorder.
•
<Search menu> is displayed.
•
You can display this menu also from the mouse
operation menu. (
Pages 32 to 33)
Step
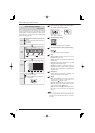
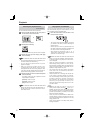
2 Select a device to search under [Play device].
HDD (Normal)
[HDD (Normal)]: Data in the normal recording area
are searched.
[HDD (Alarm)]: Data in the alarm recording area are
searched.
[HDD (Emergency)]: Data in the emergency
recording area are searched.
[HDD (Copy)]: Data in the copy device are
searched.
[HDD (Archive)]: Data in the archive device are
searched.
[HDD (Preliminary)]: Data in the pre-recorded area
for alarm or emergency recording are searched.
[DVD/CD]: Data on a DVD/CD disc are searched.
[USB memory]: Data in a USB memory device are
searched.
Notice
• For searching data in the HDD (Preliminary), you can
use time date search only.
• When the area with its capacity set to 0% in the
partition setting is designated as the playback/search
device, playback and search cannot be performed.
Therefore, select the device available for playback in
[Play device].
• When you copy or search the data recorded on a DVD/
CD or USB memory, it may take some time before the
media is completely recognized after inserted. Before
you perform copy or search, check whether the access
lamp of the DVD/CD drive or USB memory blinks.
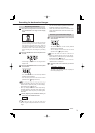
Step
3 Select the number of the camera you want to
search in [Camera fi lter].
1
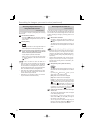
Step
4 Designate the date and time to search.
•
There are 2 methods to designate the date and time
to search, one is entering the date and time directly
and the other is designating the date and time using
a calendar.
[To designate the date and time by entering directly]
Step
4
-1
Click on each of day, month, year, hour, minute,
and second on the <Search menu> screen until
the desired value appears.
0820
01
00 00 00
-
12
-::
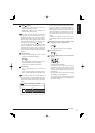
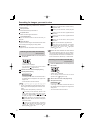
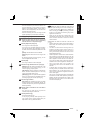
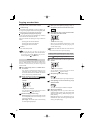
[To designate the date and time using a calendar]
Step
4
-1
Select [Time and date].
Time and date
•
The <Set the search start time> screen is displayed.
Step
4
-2
Select the year and month to search.
•
The calendar of the selected year and month
appears.
Step
Step
Step
Step
1234
5
MonSun
?
Tue Wed
01/2008
Check data
Set the search start time
Thu Fri
Sat
76891011
12
1413 15 16 17 18
19
2120 22 23 24 25
26
2827 29 30 31
102345
Hour
76891011
1312 14 15 16 17
1918 20 21 22 23
0500 10 15 20 25
Minute
3530 40 45 50 55
E:Quit
D:Execute
Search start time 01-01-2008 10 : 30 : 00
4
-2
4
-3
4
-4
4
-5
[Check data]: Click to check whether the selected
device contains recorded data or not. Dates having
recorded data are displayed in gray and dates
without recorded data are displayed in black.
When recording data exist on the last day in the
selected month, the data of the same month in other
areas are not detected.
Step
4
-3
Select the date to search.
Step
4
-4
Select the hour and minute to search.
Step
4
-5
Select [Execute].
•
The date and time designated in steps 4
-2
to 4
-4
are
displayed as the search start time and the <Search
menu> screen is displayed.