


4-12
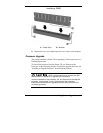
Installing System Upgrades
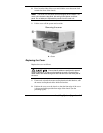
Removing the Processor
Remove the processor from its socket on the system board as follows.
Before handling components, reduce static
discharge by touching the chassis.
1.
Remove the cover (see “Removing the Cover” earlier in this chapter).
2.
Remove the diskette drive and bracket (see “Removing the 3 1/2-inch
Diskette Drive” later in this chapter).
3.
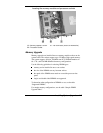
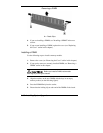
Locate the processor assembly (fan, heat sink, processor) on the
system board (see the figure “Locating the memory module and
processor sockets” earlier in this chapter).
4.
Remove any expansion boards that might be in the way of the
processor (see “Removing an Expansion Board” later in this chapter).
If the system was just running, the processor
and heat sink on the system board are hot. To avoid a burn, let the
components cool before continuing the upgrade.
5.
Carefully cut the cable tie retaining the fan cable and front panel
cables.
6.
Tag and unplug the cooling fan cable from its connector (CPU Fan)
on the system board.
7.
If in the way, tag and unplug the front panel cable from the front
panel connector.
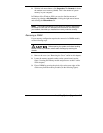
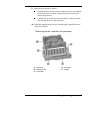
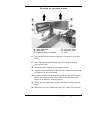
8.
Remove the fan and heat sink from the processor as follows.
Carefully press down on the flange on the right end of the
retention clip and unhook the clip from the tab on the processor
socket (see the following figure for flange location).
Unhook the retention clip from the tab on the opposite side of the
processor socket.
Remove the fan, heat sink, and retention clip from the processor.