


4-18
Installing System Upgrades
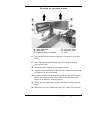
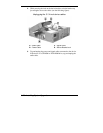
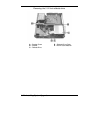
Removing an Expansion Board
Remove an expansion board as follows.
1.
Remove the cover (see “Removing the Cover” earlier in this chapter).
2.
Remove the riser board bracket (see “Installing an Expansion Board”
earlier in this section).
3.
Remove the screw securing the expansion board to the riser board
bracket.
4.
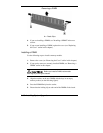
Pull the expansion board out of its connector and expansion slot.
Place the board in an antistatic bag.
5.
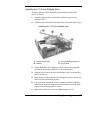
Install a new board or install the slot cover if you are not installing a
board. Secure the board or slot cover with the previously removed
screw (see “Installing an Expansion Board” earlier in this section).
6.
Install the riser board bracket (see “Installing an Expansion Board”
earlier in this section).
7.
Replace the cover (see “Replacing the Cover” earlier in this chapter).
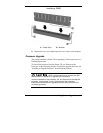
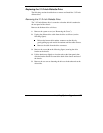
Data Storage Devices
The system board supports the following storage devices:
one 3 1/2-inch 1.44-MB diskette drive
one 3 1/2-inch IDE hard drive
one 5 1/4-inch IDE CD-ROM drive or DVD-ROM drive.
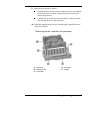
Before replacing a storage device, follow any preinstallation instructions
that come with the device. For example, check the following information.
IDE hard drive — check the jumper settings on the device before
installing it. See the documentation that comes with the device for
jumper setting information. Connect the drive as the master device on
the primary IDE channel.
CD-ROM drive or DVD-ROM drive — check the jumper settings on
the device before installing it. See the documentation that comes with
the device for jumper setting information. Connect the drive as the
master device on the secondary IDE channel.