


4-22
Installing System Upgrades
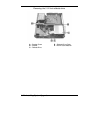
Installing a 5 1/4-Inch Accessible Device
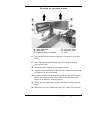
Install a 5 1/4-inch accessible device as follows.
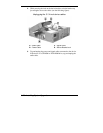
1.
With the empty device bracket latched in place (see “Removing a
5 1/4-inch Accessible Device” earlier in this section),
slide the connector end of the device through the front panel and
into the device bracket
align the front of the device flush to the bracket.
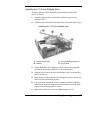
2.
Attach the device to the bracket with the previously removed top
screw (
B
on the figure “Releasing the 5 1/4-inch device” earlier in
this section).
3.
Press the bracket lock on the side of the device bracket and raise the
device bracket up to its perpendicular position.
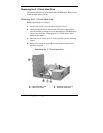
4.
Attach the bottom of the device to the bracket with the two
previously removed bottom screws (
D
on
the figure “Releasing the
5 1/4-inch device”).
5.
Lower the device bracket halfway. Plug the signal and power cables
into their connectors on the device. As appropriate, plug the audio
cable into the device.
Note
Ensure that you use the short power cable to connect to the
device. The long power cable must be used for the hard drive.
6.
Lower the device bracket all the way down until it locks in place on
the chassis.
As you lower the device bracket, ensure that all
cables are out of the way, are not pinched, and are folded correctly.
7.
Replace the system cover (see “Replacing the Cover”).