


4-16
Installing System Upgrades
Installing an Expansion Board
Install an expansion board in the system as follows.
1.
Remove the cover (see “Removing the Cover” earlier in this chapter).
2.
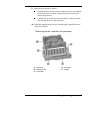
Remove the riser board bracket to access the expansion board
connectors on the riser board.
Label and remove any cable(s) connected to the expansion
board.
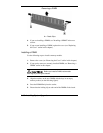
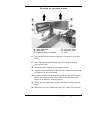
Remove the upper screw securing the bracket to the side of the
chassis (see the following figure).
Carefully pull up on the bracket to release it from the chassis and
the riser board connector on the system board. As the bracket fits
tightly, you might need to rock the bracket slightly to release it
from the chassis.
3.
If you need to remove an expansion board from the slot designated
for the new board, see “Removing an Expansion Board” later in this
section.
4.
Follow any preinstallation instructions that come with the expansion
board (such as setting jumpers on the board).
5.
If the slot is empty, remove and save the screw securing the
expansion board slot cover to the riser board bracket.
6.
Remove and save the slot cover.
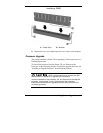
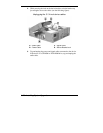
7.
Hold the expansion board by its edges or its bracket and insert the
board into the expansion slot on the riser board.