


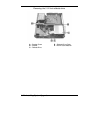


Installing System Upgrades 4-23
Replacing the 3 1/2-Inch Diskette Drive
The following sections describe how to remove and install the 3 1/2-inch
diskette drive.
Removing the 3 1/2-Inch Diskette Drive
The 3 1/2-inch diskette drive is secured to a bracket which is attached to
the rear panel of the chassis.
Remove the diskette drive as follows.
1.
Remove the system cover (see “Removing the Cover”).
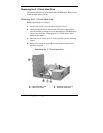
2.
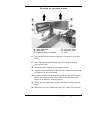
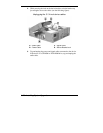
Unplug the diskette drive cable from the drive as follows (see the
following figure).
Release the brown cable retainer connector on the drive by
gently pulling up each end of the retainer until the cable releases.
Remove the cable from the drive connector.
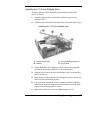
3.
Remove the screw (
A
on the following figure) securing the drive
bracket to the chassis.
4.
Lift the bracket up slightly to clear the tabs on the front panel, then
slide the bracket and drive towards the back of the chassis and out of
the chassis.
5.
Remove the two screws fastening the drive to the bracket and set the
drive aside.