


Installing System Upgrades 4-17
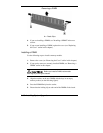
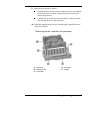
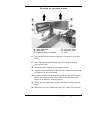
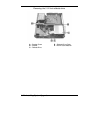
Removing the riser board bracket
A
– Upper Side Screw
D
– Slot Cover Screw
B
– Riser Board
E
– Expansion Slots
C
– Expansion Board Connectors
F
– Tab
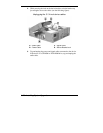
8.
Press the board firmly into the expansion slot connector on the riser
board.
9.
Secure the expansion board bracket in place with the previously
removed slot screw.
10.
Attach any cables required by the expansion board.
11.
Align the riser board bracket with the chassis and the riser board with
its connector on the system board.
12.
Carefully push the riser board bracket down until the riser board and
bracket seat. Ensure that the tab (
F
on the preceding figure) at the
bottom of the bracket is inside the chassis.
13.
Secure the riser board bracket in place with the previously removed
screw.
14.
Replace the cover (see “Replacing the Cover” earlier in this chapter).