


Installing System Upgrades 4-27
5.
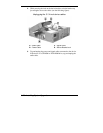
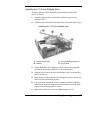
Remove the hard drive as follows.
Tilt the device bracket slightly from its vertical position, enough
to allow access to the front of the drive.
Slide the drive towards the rear of the chassis until the shoulder
screw is aligned with the vertical shoulder screw slot.
Lift the drive straight up, following the path of the shoulder
screw slots on each side of the drive bay.
6.
Unplug the power and signal cables from the hard drive.
7.
Remove the hard drive from the chassis.
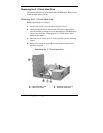
Installing the 3 1/2-Inch Hard Drive
Install the 3 1/2-inch hard drive as follows.
1.
If not already removed, remove the hard drive being replaced (see
“Removing the 3 1/2-Inch Hard Drive” earlier in this section).
2.
Remove the three shoulder screws from the old drive and install them
in the same position on the new drive.
Leave enough of the screws exposed so that each fits into the
shoulder screw slots.
3.
Hold the hard drive above the drive bay, with the drive connectors
facing the rear of the chassis.
4.
Plug the hard drive signal and power cables into their respective
connectors on the hard drive.
Note
Ensure that you use the long power cable to connect to the hard
drive. The short power cable must be used for the 5 1/4-inch accessible
device.
5.
Align the three shoulder screws with the shoulder screw slots and
lower the drive into the bay. Check that the screws are in their slots.
6.
Slide the hard drive towards the front of the chassis, following the
path of the shoulder screw slots.