3-32 Switch Management
GigWorks MkII-16 Switch Model MKII-BASE16
59003-01 Rev. A Installer's/User's Manual
Switch Utilities — Zoning
6. All ports not defined as being part of any enabled Name Server Zone are
Name Server Zone Orphans. Name Server Zone Orphans are all placed in
the same Name Server Orphan zone.
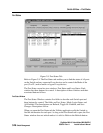
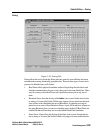
Zoning Screen
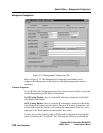
Refer to Figure 3-10. The Zoning tab enables you to read the current zoning
assignments, make or change zoning assignments, and enable or disable zones.
The Zoning screen contains areas for managing ports in Hard Zones, Broadcast
Zones, and Name Server Zones. At this time, the Switch Utilities can only
manage four zones of each type. Both the 8 and 16-port Switches can manage
four Hard Zones, 16 Broadcast Zones, and 16 Name Server Zones.
Read Zoning Button: Press to read the current zoning information. The system
displays checkmarks in the appropriate boxes on the Right side of the screen to
show the zone status.
Apply Changes Button: Press to apply any changes made to the checkboxes on
the Right side of the screen. The checked/unchecked boxes take effect as soon as
they are applied.
Caution: The application of Hard Zones to an operating Switch will
disrupt all traffic and change the port addresses assigned to each device
on the Switch. Re-initializing connected devices may be necessary.
Clear Button: Press to clear all zoning checkmarks. Use the Apply Changes
Button to make the Clear take effect.
Number of Ports field: This field indicates the number of ports in the Switch.
Hard Zones: The Hard Zones area contains checkboxes for managing up to four
Hard Zones and up to 16 ports. Click a port checkbox in a particular Zone row to
define the port in that zone. The Utilities will automatically check the other ports
in that group to force the rule that all ports in a group must be in the same Hard
Zone. Click a checked checkbox to un-check it. When you check a box in a
particular zone, the Utilities will automatically check the Enabled checkbox for
that zone. You may un-check it if you wish. The Utilities do this to keep you from
forgetting to enable the zone.
Click the Enabled checkbox for a particular zone to enable the zone. Uncheck the
Enable box for a particular zone to disable the zone.
Press the Apply Changes Button to put the changes into effect.
Broadcast Zones: The Broadcast Zones area contains checkboxes for managing
up to four Broadcast Zones and up to 16 ports. Click a port checkbox in a
particular Zone row to define the port in that zone. The Switch will automatically
perform rules checking that will not allow you to violate the rule about not


