


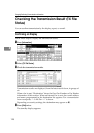
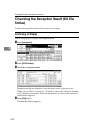

Checking the Transmission Result (TX File Status)
201
4
Confirming by Report and E-mail
You can confirm transmission results using both the E-mail TX Results function,
which sends the results by e-mail, and the Communication Result Report print-
ed by the machine.
You can set whether to use both of these together in User Parameters (switch 10, bit 6)
in the Facsimile Features menu.
Reference
“Facsimile Features”, General Settings Guide
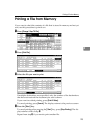
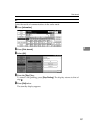
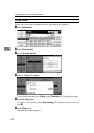
Communication Result Report (Memory Transmission)
This report is printed when a Memory Transmission is completed, so you can
check the result of the transmission.
Note
❒ If E-mail TX Results is programmed in a Quick Operation key, you can select
whether a report e-mail is sent after transmission.
❒ If two or more destinations are specified, this report is printed after the fax
document is sent to all the destinations.
❒ If the machine is set up not to print this report and the fax document could
not be successfully transmitted, a Communication Failure Report is printed.
❒ You can turn this function on or off with the User Parameters (switch 03, bit 0)
in the Facsimile Features menu.
❒ You can display a sender name with the User Parameters (switch 04, bit 5) in
the Facsimile Features menu.
❒ You can select whether to include part of the original image on the report with
the User Parameters (switch 04, bit 7) in the Facsimile Features menu.
❒ To view the report without text disruption, select a font of even character
width in your e-mail application's settings.
❒ You can set whether or not to display a destination with the User Parameters
(switch 04, bit 4) in the Facsimile Features menu.
❒ The Pg(s) column gives the total number of pages. The Page Not Sent column
gives the number of pages that could not be sent successfully.
❒ “--” indicates that the Internet Fax document was sent to the mail server pro-
grammed in this machine. (However, this does not mean the e-mail was delivered.)
Reference
p.203 “Communication Failure Report”
“Facsimile Features”, General Settings Guide