Troubleshooting When Using the Printer Function
50
4
When You Cannot Print
This section describes what to do if printing does not start even after performing
[Print].
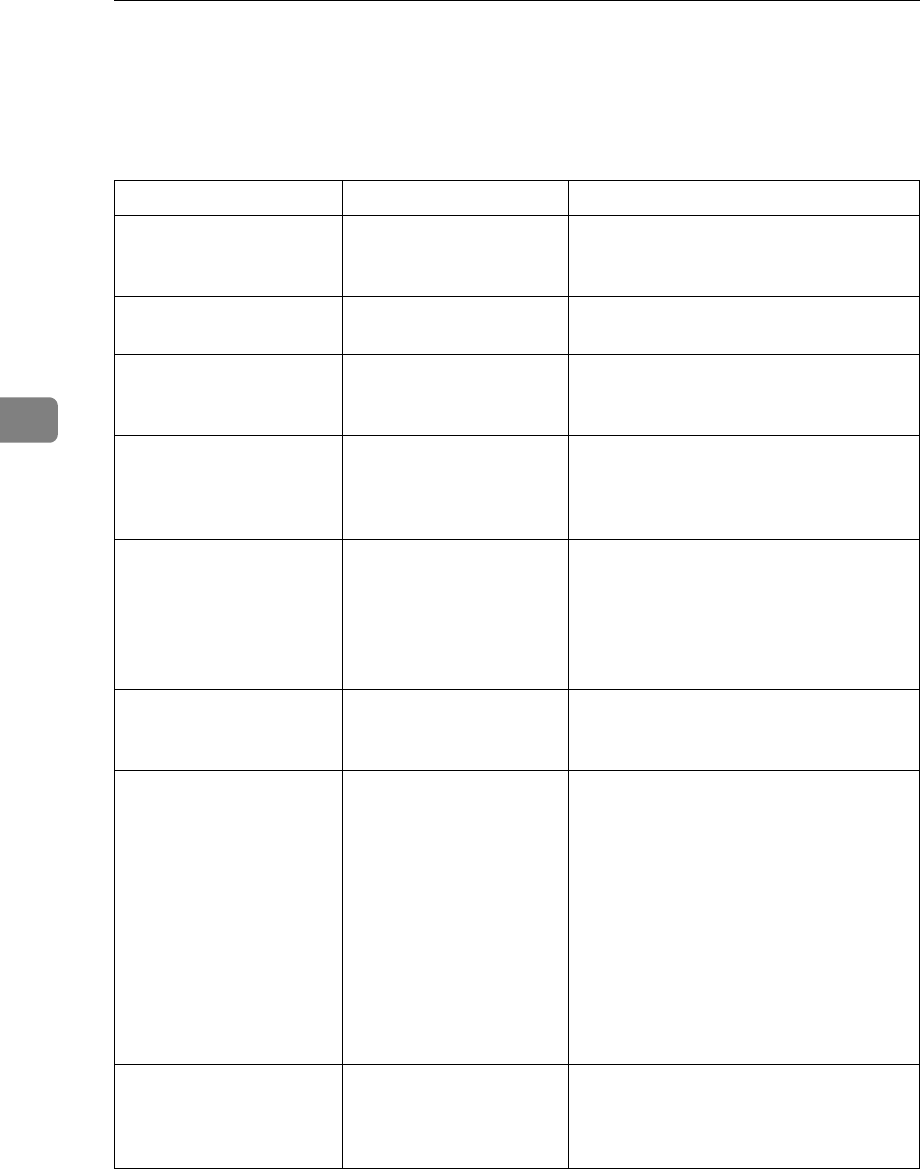
Problem Cause Solution
Printing does not start. The power is off. Check that the cable is securely plugged
into the power outlet and the machine.
Turn on the main power switch.
Printing does not start. The machine is set to
“Offline”.
Press [fOnline] on the display panel.
Printing does not start. The cause is displayed
on the display of the con-
trol panel.
Check the error message or warning sta-
tus on the display panel and take the re-
quired action.
Printing does not start. The interface cable is not
connected correctly.
Connect the interface cable securely. If it
has a fastener, fasten that securely as
well. See “Connecting the Machine”,
General Settings Guide.
Printing does not start. The correct interface ca-
ble is not being used.
The type of interface cable you should
use depends on the computer. Be sure to
use the correct one. If the cable is dam-
aged or worn, replace it. See “Connect-
ing the Machine”, General Settings
Guide.
Printing does not start. The interface cable was
connected after the ma-
chine was switched on.
Connect the interface cable before turn-
ing on the machine.
Printing does not start. If the machine is using
wireless LAN, a weak
wireless signal might be
causing print to fail.
To check signal status, press the {User
Tools/Counter} key, and then press [Sys-
tem Settings] on the display panel. On the
[Interface Settings] tab, select [IEEE
802.11b], and then press [Wireless LAN Sig-
nal]. If signal quality is poor, move the
machine to a location where radio
waves can pass or remove objects that
might cause interference.
(You can check signal status only when
using wireless LAN in the infrastructure
mode.)
Printing does not start. If the machine is using
wireless LAN, SSID set-
tings are incorrect.
Check using the machine's display pan-
el that the SSID is correctly set. See “In-
terface Settings”, General Settings
Guide.


