


27
Press the [SETUP] key. This detects the width of the
material and shows the printable width on the display.
*When [EDGE] is selected in step 9, the width of
the loaded material is detected, then the front
edge of the material is aligned with the print-start
location.
10
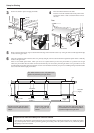
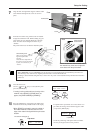
Align the left- and right-hand stoppers with the width
of the material and tighten the screws to secure in
place.
7
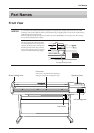
Rear
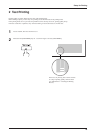
Close the front cover.
Use the [
] and [ ] keys to select [ROLL], then
press the [ENTER] key.
*If printing is to be performed from the edge of
the material, select [EDGE] (If [EDGE] does not
appear, set [EDGE SENSE] to [ENABLE]).
9
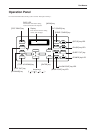
Top menu
W1000mm L ---mm
FINE BI-DIR
The SETUP LED lights up
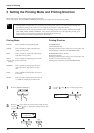
If a pinch roller is positioned over an area where is no
grit roller, the massage shown at below appears when
you press the [SETUP] key.
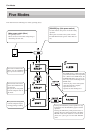
SETUP SHEET
ROLL EDGE PIECE
PINCHROLL ERROR
INVALID LEFTPOS
or [RIGHT]
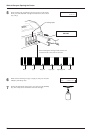
Setup for Printing
Check the positioning of the pinch rollers and make
sure they are aligned at the correct positions.
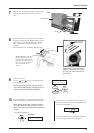
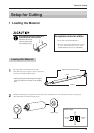
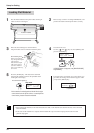
From the front of the unit, pull the center of material
straight out toward the front. Without letting any part
of the entire piece of material pulled out to become
slack, move the sheet loading lever all the way to
“LOAD.”
The pinch rollers lower to hold the material in place.
8
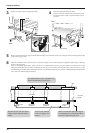
Rear
Entire material
stretched taut
* If there is slackness in the loaded
material, the material may move at
an angle and come loose from the
pinch rollers.
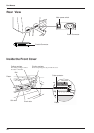
Screw
Stopper
Media flange
Roll material
Sheet loading lever
When moved partway, only the
right-hand pinch roller descends.
Data cannot be output while in this
state. To secure the material in
place, move all the way to
"LOAD."