


79
Description of Menu Items
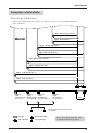
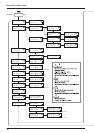
Description of Menus
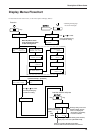
Pressing the [MENU] key enters the menu mode.
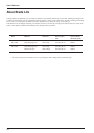
Default
value
Setting
range
FunctionSubmenu
Top
menu
DEMO
PRINT &
CUT
——This performs printing or cutting of sample data.
[PRINT & CUT]: This outputs the sample data for printing and cutting.
[PRINT]: This outputs the sample data for printing.
[CUT]: This outputs the sample data for cutting.
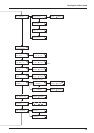
CARIBRATION 0%
0%
This corrects for errors in the amount of feed of the grit rollers due the
type of material.
Be sure to make this setting when you have replaced the material with
a different type.
Make this setting again when horizontal stripes are plainly visible on
printing results.
[TEST PRINT]: This menu is for verifying the adjustment.
[ADJUST]: This sets the correction value.
For more information, see "User's Reference -- Making Corrections for
Printing -- Feed Correction"
This corrects the cutting length relative to the print length (distance
correction).
For more information, see "User's Reference -- Aligning the Printing
Length and Cutting Length"
[FEED ADJUST]: This sets the adjustment value for the material-feed
direction.
[SCAN ADJUST]: This sets the adjustment value for the left-right
direction (the carriage-movement direction).
PRINTING
ADJ.
(*)
CUTTING
ADJ.
[PRINTING ADJ.]
-2.0% to +2.0%
(In steps of 0.05%)
[CUTTING ADJ.]
-2.0% to +2.0%
(In steps of 0.01%)
BIDIRECTION
Correction
value when
shipped
from the
factory
This adjusts for slippage when performing bidirectional printing.
This must be readjusted when you have replaced the material with a
different type or adjusted the head height.
[TEST PRINT]: This menu is for verifying the adjustment.
[ADJUST]: This sets the correction value.
For more information, see "User's Reference -- Making Corrections for
Printing -- Bidirectional Correction."
TEST PRINT
ADJUST
-15 to +15
(In steps of 1)
OVER
PRINT
(*)
NONE
You can carry out the same printing superimposed over the same
location. When printing materials such as fabric, colors may not come
out well with just a single printing pass.
This should normally be set to [NONE].
For more information, see "User's Reference -- Performing Overprint-
ing."
— NONE/2/3
DRYING
TIME
(*)
NONE
This sets the drying time for the material. For materials with low
absorbency that are difficult to dry, make the setting for a longer time.
When printing is followed by cutting, cutting is performed after
waiting for the set time.
—
NONE/
10 to 990 sec.
(In steps of 10 sec.)
EDGE
SENSE
— ENABLE/
DISABLE
ENABLE
This specifies whether detection of the front and rear edges of the mate-
rial is enabled or disabled. This should normally be set to [ENABLE].
When loading transparent material or material with a width of 131 to 430
mm (5-3/16 to 17 in.), set this to [DISABLE]. When set to [DISABLE],
then during material setup only the [ROLL] selection is available. When
doing this, ensure a margin of 35 mm (1-7/16 in.) or more from the lead-
ing edge of the material to the start position for printing or cutting.
Description of Menu Items
CROP MARK
(*)
— ENABLE/
DISABLE
DISABLE
This specifies whether output of crop marks is enabled or disabled.
When set to [ENABLE], crop marks are automatically added to the
data sent from the computer and printed.
When you use the program to make the setting for the
corresponding item, the program’s setting takes priority.
To give priority to the setting made on the machine, turn
off the program’s settings.
(*)