


90
What to Do If...
The material becomes jammed
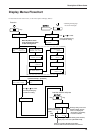
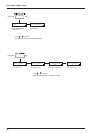
If [MOTOR ERROR : TURN OFF POWER] appears and operation stops
(1) Press the [POWER] key to switch off the sub power.
(2) Remove the jammed material. Cut off any creased or torn portions.
(3) Correct whatever caused the material to jam.
(For example, if thick material has been loaded, then adjust the height of the printing heads.)
(4) Press the [POWER] key to turn on the sub power.
(5) Load the material and carry out setup.
(6) Press the [CLEANING] key to perform head cleaning (see “Maintenance -- Cleaning the Printing Heads”).
(7) Press the [TEST PRINT] key to perform a printing test (see “Maintenance -- Cleaning the Printing Heads”).
(8) Send the printing data and perform printing.
* Jammed material may damage or soil the printing heads. Be sure to perform head cleaning first before sending the printing or cutting
data.
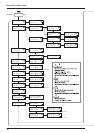
When printing was continued, but should be started over
(1) Press the [PAUSE] key to pause operation.
(2) Stop sending data from the computer.
(3) Press the [SETUP] key. Hold down for about 1 second (making the SETUP LED go dark).
(4) Press the [POWER] key to switch off the sub power.
(5) Remove the jammed material. Cut off any creased or torn portions.
(6) Correct whatever caused the material to jam.
(For example, if thick material has been loaded, then adjust the height of the printing heads.)
(7) Press the [POWER] key to turn on the sub power.
(8) Load the material and carry out setup.
(9) Press the [CLEANING] key to perform head cleaning (see “Maintenance -- Cleaning the Printing Heads”).
(10) Press the [TEST PRINT] key to perform a printing test (see “Maintenance -- Cleaning the Printing Heads”).
(11) Send the printing data and perform printing.
* Jammed material may damage or soil the printing heads. Be sure to perform head cleaning first before sending the printing or cutting
data.
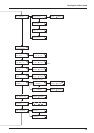
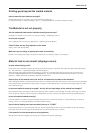
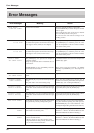
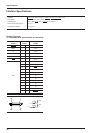
Printed lines are misaligned
[Example]
OK: Correct Not OK: Single lines not produced
If misalignment like in the example occurs when the printing direction for [PRINT QUALITY] has been set to [BI-DIRECTION]
(bidirectional), then carry out correction at the [BIDIRECTION] menu (see "User's Reference -- Making Corrections for Printing --
Bidirectional Correction").
Be sure to make this adjustment when you have replaced the material with a different type or adjusted the head height.