


Using USB memory device_ 83
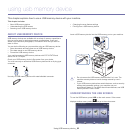
When an USB memory is inserted into the USB memory port on your
machine, USB icon shows on the screen.
From the USB screen, press USB Format or, USB Print or, Scan to USB.
• USB Format: You can delete files stored on an USB memory device
one
by one or all at once by reformatting the device.
• USB Pr
int: You can directly print files stored on an USB memory
device. You can print TIFF, BMP, JPEG, PDF, and PRN files. (See
"Printing from a USB memory device" on page 84.)
• Sc
an to USB: You can scan a data and send directly to USB memory
device. You can specify image size, file format, or color mode for each
scanning to USB job. (See "Scanning to an USB memory device" on
page 83.)
SCANNING TO AN USB MEMORY DEVICE
You can scan a document and save the scanned image onto an USB
memory device. When you scan a document, the machine uses the default
settings such as the resolution. You can also customize your own scan
setting. (See "Changing the scan feature settings" on page 83.)
1. Insert a USB memory device into the USB memory port on your
machine.
2. Place the originals face up in the document feeder. Or place a single
original face down on the scanner glass.
3. Pr
ess USB from the main screen.
4. Pr
ess Scan to USB.
5. Set
the scan features in the Advanced, Image, or Output tabs. (See
"Changing the scan feature settings" on page 83.)
6. Pr
ess Start on the control panel to begin scanning.
7. After sca
nning is complete, you can remove the USB memory device
from the machine.
CHANGING THE SCAN FEATURE SETTINGS
This part explains how to adjust the document settings for each scan job,
such as resolution, duplex, original size, original type, color mode,
darkness, and more. The options you change will be maintained for a
certain time, but after a period, the options will be reset to default values.
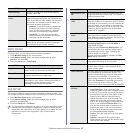
Duplex
This feature especially applies when the original documents to be scanned
are two-sided. You can select whether to scan only one side of the paper or
both sides of the paper.
Press USB > Scan to USB > the Basic tab > Duplex. Use left/right arrows
to toggle the values.
• 1 Sided: For originals that are printed on one side only.
• 2
Sided: For originals that are printed on both sides.
• 2 Sided, Rotate
Side 2: For originals that are printed on both sides. But
the back is rotated 180 degrees.
To use 2 Sided and 2 Sided, Rotate Side 2, you have to load the
originals on the document feeder. Because, if the machine can not
detect the original on document feeder, it automatically changes the
option to 1 Sided.
Resolution
You can adjust document resolution.
Press USB > Scan to USB > the Basic tab >Resolution. Use left/right
arrows to toggle the values. The higher value you select the clear result you
get. But the scanning time may take longer.
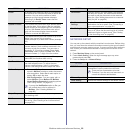
Original Size
You can adjust document size.
Press USB > Scan to USB > the Advanced tab > Original Size. Select the
appropriate option and press OK.
Original Type
You can set the original document type in order to enhance the quality of a
document being scanned.
Press USB > Scan to USB > the Image tab >Original Type. Select the
appropriate option and press OK.
• Text: Use for originals containing mostly text.
• Te
xt/Photo: Use for originals with mixed text and photographs.
• Ph
oto: Use when originals are photographs.
Color Mode
Use this option to scan the original in Mono, Gray or Color Mode.
Press USB > Scan to USB > the Image tab > Color Mode. Select the
appropriate option and press OK.
• Color: Displays an image in color. 24 bits per pixel.
• Gray
: Displays an image in gray. 8 bits per pixel.
• Mono: Displays an image in black and white. 1 bit per pixel.
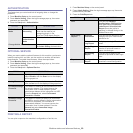
The file format JPEG cannot be selected in the File Format option, if
Mono has been selected for Color Mode.
Darkness
You can select the degree of darkness of the scanned output. If your
original document is light or faded, press the right arrow to make the output
darker.
Press USB > Scan to USB > the Image tab > Darkness. Press right arrow
to enhance the darkness degree then, press OK.
Erase Background
You can lighten, reduce or delete the dark background from scanning
colored paper or newspaper originals.
Press USB > Scan to USB > the Image tab > Erase Background. Select
the appropriate option and press OK.
• Off: Sets this option off.
• Auto: Automatically adjusts background brightness.
• En
hance: Darkens the background. Use left/right arrows to toggle the
values. The higher the number is, the more vivid the background is.
• Erase: Lightens the background. Use left/right arrows to toggle the
values. The higher the number is, the lighter the background is.