


LOADING LABELS, TAGS AND RIBBON CL608 and CL612
LOADING LABELS OR TAGS
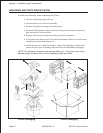
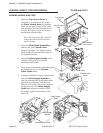
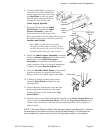
1. Open the Side Access Door by
swinging it up and to the left. The
hinge system automatically
dampens the movement to
prevent the door from
inadvertently falling and possibly
causing injury to the operator.
2. Open the Print Head Assembly
by pushing the Head Latch
toward the rear of the printer. The
Print Head Assembly is
spring-loaded and will
automatically open as soon as the
Head Latch is disengaged.
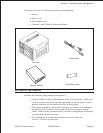
3. Push the Label Supply Guide to the outside of the printer to give the maximum
label width.
4. Release the Label Roll Support by pulling outward at the top and swing it down
and out of the way.
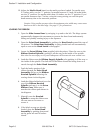
5. If using roll labels (or tags), load the roll onto the Label Supply Spindle so that
the printing side of the labels faces upwards as it unwinds from the roll. The
labels should be wound face-in. Push the roll all the way to the inside of the
printer and push the Label Supply Guide snugly against the outside of the
label roll.
6. If using fanfold labels (or tags) set them on a flat surface behind the printer. Pass
the labels (printing side up) through the slot and under the Label Supply
Spindle.
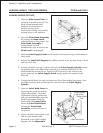
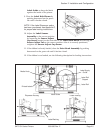
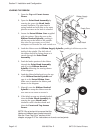
7. Open the Label Hold-Down by
squeezing the green tab and the
release tab together. The Label
Hold-down is spring loaded and
will open automatically when the
latch is disengaged. Feed the
labels under the Label Guide,
under the Label Hold-Down,
through the Print Head
Assembly and out the front of
the printer.
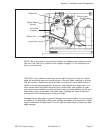
8. Inspect the label routing and verify
that the path matches that
illustrated in the Label Loading
diagram. Set the Adjustable
Head Latch
Sensor Adjust
Cap Screw
Label Hold-Down
Sensor Adjust
Tab
Section 2. Installation and Configuration
Page 2-49001035 Rev. ESATOCL SeriesPrinters