


Troubleshooting
198 Avaya CMS Sun Fire V880/V890 Installation, Maintenance, and Troubleshooting May 2006
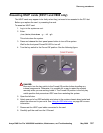
9. Reinsert the HSI/P card into the slot on the I/O board. Make sure that the card is fully
seated.
10. Rotate the purple PCI retaining clip over the back of the card faceplate until it snaps into
place.
11. Remove the ESD wrist strap.
12. Close the left door.
13. Reattach the HSI/P quad cable.
14. Turn on any external SCSI devices, starting with the device that is farthest from the system
and working toward the system.
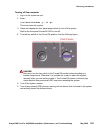
15. Turn on the system monitor.
16. Turn on the system. Do not put the key switch in the locked position.
17. When the system comes back up, log in as root.
18. Test the card to see if it is now working. If the card is still not working, see Replacing an
HSI/P card on page 83.
Resetting a device alias
If a boot disk is replaced, or if the NVRAM chip is ever reset permanently to the Sun factory
defaults, the boot disk and EEPROM values must be reset to the Avaya factory defaults. This
can happen when any of the following occurs:
● The NVRAM chip has been replaced
● The set-defaults or setenv use-nvramrc? false command is run
● A PROM patch is applied
To reset the NVRAM to bootable options for the boot disks:
1. At the ok prompt, enter:
show-disks
The disk devices are displayed.
2. Select the letter for the proper boot device. For example:
/pci@8,600000/SUNW,qlc@2/fp@0,0/disk
This copies the boot device string into the editor clipboard.
3. Enter:
nvalias disk Ctrl+Y (that is, press and hold the Ctrl key and the y key)