


3-6 Installation and Replacement
Installing The Vanguard 6435/6455
Installing the 6455 Rack Mount Version
Introduction This section explains how to install the rack mount version of the Vanguard 6455.
Be sure that you have the mounting brackets that came with the unit.
Installation
Variation
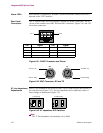
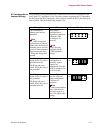
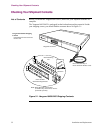
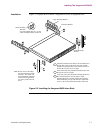
When rack-mounting a Vanguard 6455, you can orient the unit in either of two ways:
• Front Panel Forward: The front panel faces the front of the rack. This allows
you to easily read the LCD panel display. The cables run out the rear of the
rack.
• Rear Panel Forward: The rear panel faces the front of the rack. This allows
you to easily access the cables and to replace and install the motherboard and
cards.
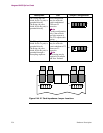
For either mounting method, refer to Figure 3-3.
Rack-Mount
Cautions
Take note of these considerations before and after rack-mounting your Vanguard
6455.
Caution
It is possible to subject the rack-mounted Vanguard 6455 to high temperatures. Be
sure the ambient temperature in the equipment rack and around the inlets of the cards
and power supply does not exceed the recommended temperature limits listed in
Appendix A.
Caution
Be sure that the rack-mounted Vanguard 6455 has adequate air flow for cooling
purposes. Leave a minimum of 2 inch (5 cm) clearance on each side. (Inadequate
airflow can cause thermal shutdown of the power supply.)
Caution
When mounting a Vanguard 6455 in a rack, be sure the mounting screws are
adequately tightened so the enclosure does not bend or fall.
Caution
Be sure that the power circuit to which the Vanguard 6455 is connected is not
overloaded.
Caution
Be sure that the rack-mounted Vanguard 6455 is properly grounded at all times.