


Installing the Module 3-7
Installing the
Module
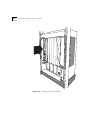
You do not need to power off the CoreBuilder 5000 hub to install or
remove the 24-Port module. You can insert the module while the hub
is operating (this is called a hot swap). Follow the steps below to install
the 24-Port module.
1 Properly ground yourself prior to handling the 24-Port module.
For example, attach a static wrist guard to yourself or touch a
grounded static mat prior to handling the 24-Port module.
2 Configure the 24-Port module as follows:
■ If you plan to install the 24-Port module in a managed hub (DMME
Version v1.0 or later, for example), proceed to Step 3 to complete
the installation. Then use the information in the section
Configuring the Module
later in this chapter to configure the
appropriate settings.
■ If you plan to insert the 24-Port module in an unmanaged hub,
configure the DIP switch settings on the module to the desired
settings (see the section Setting the DIP Switches
earlier in this
chapter) and proceed to Step 4.
3 Enter the SHOW POWER BUDGET command to ascertain if the hub has
enough power for the new module. Refer to the section Electrical
Specifications in Appendix A for more detailed information on the
power needed for each of the specified Watt ranges.
Refer to the Distributed Management Module Commands Guide for
more detailed information on the SHOW POWER BUDGET command.
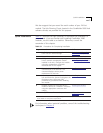
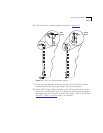
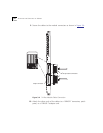
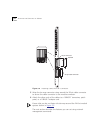
4 Locate an open slot in the hub. Remove the blank panel on the hub to
expose a slot for the module.
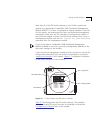
5 Insert the module into the board guides at the top and bottom of the
slot and slide it into the hub by pressing firmly at the top and bottom
of the faceplate. Figure 3-2
shows the installation of the module.