


4 Configuring the system
90
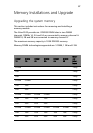
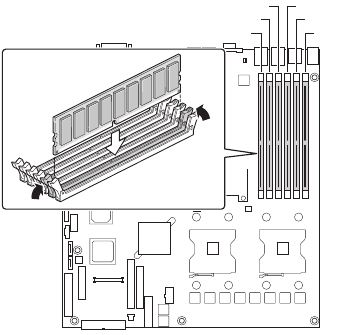
Installing and Removing Memory
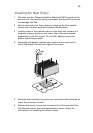
The silkscreen on the board for the DIMMs displays DIMM1B, DIMM1A,
DIMM2B, DIMM2A, DIMM3B, and DIMM3A, starting from the edge of
the board. DIMM3A is the socket closest to the processor socket. See
“Memory” for a discussion of the memory requirements and options.
See “Additional Information and Software” for a link to the list of
tested DIMMs.
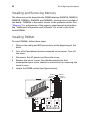
Installing DIMMs
To install DIMMs, follow these steps:
1 Observe the safety and ESD precautions at the beginning of this
book.
2 Turn off all peripheral devices connected to the server. Turn off
the server.
3 Disconnect the AC power cord from the server.
4 Remove the server’s cover. See the documentation that
accompanied your server chassis for instructions on removing the
server’s cover.
5 Locate the DIMM sockets (see figure below).
DIMM 2A
DIMM 3B
DIMM 3A
DIMM 2B
DIMM 1A
DIMM 1B