


91
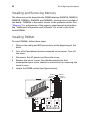
6 Make sure the clips at either end of the DIMM socket(s) are pushed
outward to the open position.
7 Holding the DIMM by the edges, remove it from its anti-static
package.
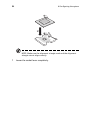
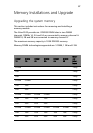
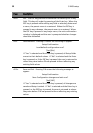
8 Position the DIMM above the socket. Align the two small notches
in the bottom edge of the DIMM with the keys in the socket (see
inset in the figure above).
9 Insert the bottom edge of the DIMM into the socket.
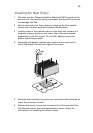
10 When the DIMM is inserted, push down on the top edge of the
DIMM until the retaining clips snap into place. Make sure the clips
are firmly in place.
11 Replace the server’s cover and reconnect the AC power cord. See
the documentation that accompanied your server chassis for
instructions on installing the server’s cover.
Removing DIMMs
To remove a DIMM, follow these steps:
1 Observe the safety and ESD precautions at the beginning of this
book.
2 Turn off all peripheral devices connected to the server. Turn off
the server.
3 Remove the AC power cord from the server.
4 Remove the server’s cover. See the documentation that
accompanied your server chassis for instructions on removing the
server’s cover.
5 Gently spread the retaining clips at each end of the socket. The
DIMM lifts from the socket.
6 Holding the DIMM by the edges, lift it from the socket, and store it
in an anti-static package.
7 Reinstall and reconnect any parts you removed or disconnected to
reach the DIMM sockets.
8 Replace the server’s cover and reconnect the AC power cord. See
the documentation that accompanied your server chassis for
instructions on installing the server’s cover.