


29
Computer video compensation
The video compensation for connected computers is achieved using the main
menu. Although the compensation can be applied from any local, remote
or global user port, it is best achieved using the local user port because this
provides the most direct view of the computer output. The compensation
is achieved simply by registering the link cable length, however, different
cables can vary in their characteristics so it is often useful to ‘fine tune’ the
compensation by eye.
Note: CATx cables below 10m give very little loss and so it is not normally
necessary to be concerned about setting any computer video compensation if
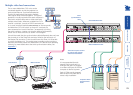
short CATx cables are being used between the AdderView CATx and the CAM
for each computer.
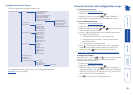
To apply computer video compensation
1 Place a computer (connected via its CAM and category 5, 5e or 6 cable) into
the highest resolution video mode at which it will be used.
2 If possible, use a monitor and keyboard connected to the AdderView CATx
local user port.
3 Display the AdderView CATx main menu and use it to select the appropriate
computer.
Note: You must highlight the computer name and press to select it.
4 Display the AdderView CATx main menu again.
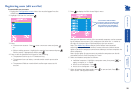
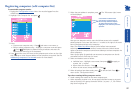
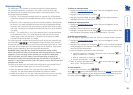
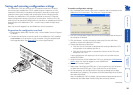
5 Press
to access the compensation feature:
Ensure that the appropriate computer is
marked by the arrow - if it is not marked,
the computer is not correctly selected and
the compensation will not be applied.
The value in the green area indicates the
currently selected cable length.
6 Use
and
to increase or decrease the stated cable length, as required.
Note: As you adjust the Length value, check the video image for signs of
under- or over- compensation, especially to the right hand side of any hard
vertical edges of images.
7 When the correct compensation has been applied, press to quit the
screen and save the settings.