


72
Global Preferences
Global preferences are available only to
the Admin user and allow settings to be
made that affect all users attached to the
AdderView CATx.
Autoscan Mode
Settings: SCAN LIST, ACTIVE PCs, ALL PCs
The AdderView CATx supports an autoscan mode that automatically scans
between the connected computers in sequence. There are three autoscan
modes. In the first mode the AdderView CATx will scan all the named computers
that are defined in the autoscan list (SCAN LIST). The computers defined in the
scan list may be connected to cascaded AdderView CATx units. If you wish to
scan the ports on the current AdderView CATx then you may select ALL the
available computers or just the available computers that are currently powered
on (the ACTIVE computers). Scanning just the active computers avoids blank
screens from being displayed and stops the monitor from going into a power
down state on every scan cycle.
WARNING - Many modern monitors are fitted with automatic power save
relays and will switch off after a few seconds if connected to an inactive
PC. If you are using such a monitor you must not set the AdderView CATx
to scan ALL ports. Constant switching on and off of your monitor’s relay
will eventually damage your monitor. If you are using the SCAN LIST
option then you should ensure that all the computers are active if you are
using one of these monitors.
If you choose to use the SCAN LIST option then you may define the computers
to be scanned in the following manner.
To define the autoscan list
Note: Ensure that you are logged in as the ADMIN user.
1 From the main on-screen menu press F1 for MORE MENUS.
2 Select EDIT AUTOSCAN LIST from the menu. A list of defined computers
will appear. Computers affixed with a ‘+’ will be autoscanned during the
autoscan cycle. To add/remove a computer to/from the autoscan list, move
the selection bar over the computer name and press SPACE BAR. To add all
named computers press F1. To remove all named computers press F2.
3 When all the computers that you wish to scan are affixed with a ‘+’, press
RETURN or ENTER to save the selections. The selected computers will be
autoscanned in alphabetical order when you activate autoscan mode (when
the SCAN LIST option is selected).
Autoscan Period
Settings: DISABLED; 2, 5, 7, 15, 30 SECONDS, 1, 5 MINUTES
The autoscan time defines the length of time that the AdderView CATx will
display video (and play audio) from an autoscanned computer before changing
to the next computer. If the DISABLED setting is chosen then no autoscan
functions will be available.
continued
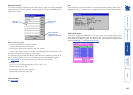
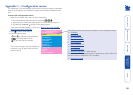
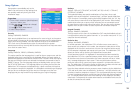
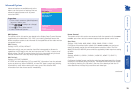
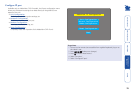
ADDERVIEW CATx IP
Global Preferences
Mouse Switching : ENABLED
Screen Saver : DISABLED
Autoscan Mode : SCAN LIST
Autoscan Period : 5 SECONDS
OSD DwellTime : 2 SECONDS
UserTimeout : 2 SECONDS
RS232 MouseType : INTELLIMSE
MouseType : LOGITECH
Space-Toggle
-Up -Down Esc-Quit
To get here
1 From a local, remote or global keyboard,
log on as ‘admin’ user.
2 Press
(hotkeys can change).
3 Press to select ‘More menus’.
4 Select ‘Global Preferences’.
Mouse Switching
Settings: ENABLED, DISABLED
The computer channel can be switched using a three button mouse or
IntelliMouse. Pressing the central button or wheel button together with the
left hand mouse button will cause the AdderView CATx to switch to the next
available computer. When mouse switching is enabled the central mouse button
or wheel mouse button is allocated to control the AdderView CATx and is not
therefore available for use by computer applications. If you want to use the
central mouse button within your applications you will need to disable mouse
switching. The rotation action of an IntelliMouse wheel is not affected and is
always available to the computer application.
Screen Saver
Settings: DISABLED; 2, 5, 7, 10,15, 20 & 30 MINUTES
To avoid burning out the phosphor on CRT monitor screens, the AdderView
CATx can be set to blank the screen after no keyboard or mouse activity has
been detected for a selected timeout period. If preferred, the user can blank
the screen manually by selecting channel ‘0’ using the keyboard hotkeys or by
pressing ESC from the login screen.