


Drive Enclosure Troubleshooting
007-5510-002 125
To remove an AC PCM - Thumb Screw Model:
Warning Do not remove the faulty PCM unless you have a replacement unit of the correct type ready for
insertion.
If a power supply unit or its fan is faulty, you must replace the whole PCM.
As there should always be two PCMs installed, you can continue working while replacing the faulty
module.
1 Make sure you identify the faulty PCM correctly from the two modules installed.
2 Lift latch which secures the power supply cord.
3 Switch off and disconnect the power supply cord.
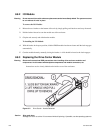
4 Remove the two thumbscrews on the right and left sides of the unit.
5 Firmly grip the handle on the bottom of the unit and withdraw the PCM.
To install an AC PCM - Handle Model:
6 Check for damage, especially to the rear connector on the PCM.
Caution Handle the module carefully and avoid damaging the connector pins. Do not install the module if any pins
appear to be bent.
7 With the PCM handle in the open position, slide the module into the enclosure.
8 Cam the module home by manually closing the PCM handle. A click should be heard as the handle
latches engage.
9 Connect the power supply cord to the power source, secure the latch over the cord, and switch the power
supply ON.
Note The alarm will sound until the new PCM is operating correctly.
To install an AC PCM - Thumbscrew Model:
1 Check for damage, especially to the rear connector on the PCM.
Caution Handle the module carefully and avoid damaging the connector pins. Do not install the module if any pins
appear to be bent.
2 Slide the module into the enclosure and push unit you hear a click as the latch is engaged.
3 Secure the two thumbscrews on the left and right sides of the unit.
4 Connect the power supply cord to the power source; secure latch, and switch the power supply ON.
Note The alarm will sound until the new PCM is operating correctly.