


Chapter 3. Quick Start Guide RX3141 User’s Manual
14
5. In the Select Network Component Type dialog box, select
Protocol
, and then click
<Add>
button.
6. Select
Internet Protocol (TCP/IP)
in the Network Protocols list, and then click
<OK>
button.
You may be prompted to install files from your Windows 2000 installation CD or other media. Follow
the instructions to install the files.
7. If prompted, click
<OK>
button to restart your computer with the new settings.
Next, configure the PCs to accept IP addresses assigned by the RX3141:
8. In the Control Panel, double-click the
Network and Dial-up Connections
icon.
9. In Network and Dial-up Connections window, right-click the
Local Area Connection
icon, and
then select
Properties
.
10. In the Local Area Connection Properties dialog box, select
Internet Protocol (TCP/IP)
, and then
click
<Properties>
button.
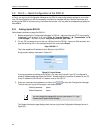
11. In the Internet Protocol (TCP/IP) Properties dialog box, click the radio button labeled
Obtain an
IP address automatically
. Also click the radio button labeled
Obtain DNS server address
automatically
.
12. Click
<OK>
button twice to confirm and save your changes, and then close the Control Panel.
3.2.4 Windows® 95, 98, and Me PCs
1. In the Windows task bar, click the
<Start>
button, point to
Settings
, and then click
Control
Panel
.
2. Double-click the
Network
icon.
In the Network dialog box, look for an entry started w/ “
TCP/IP ->
” and the name of your network
adapter, and then click
<Properties>
button. You may have to scroll down the list to find this entry.
If the list includes such an entry, then the TCP/IP protocol has already been enabled. Skip to step 8.
3. If Internet Protocol (TCP/IP) does not display as an installed component, click
<Add>
button.
4. In the Select Network Component Type dialog box, select
Protocol
, and then click
<Add>
button.
5. Select
Microsoft
in the Manufacturers list box, and then click
TCP/IP
in the Network Protocols
list, box and then click
<OK>
button.
You may be prompted to install files from your Windows 95, 98 or Me installation CD or other
media. Follow the instructions to install the files.
6. If prompted, click
<OK>
button to restart your computer with the new settings.
Next, configure the PCs to accept IP information assigned by the RX3141:
7. In the Control Panel, double-click the Network icon.
8. In the Network dialog box, select an entry started with “
TCP/IP ->”
and the name of your network
adapter, and then click
<Properties>
button.
9. In the TCP/IP Properties dialog box, click the radio button labeled
Obtain an IP address
automatically
.
10. In the TCP/IP Properties dialog box, click the “
Default Gateway
” tab. Enter 192.168.1.1 (the
default LAN port IP address of the RX3141) in the “
New gateway
” address field and click
<Add>
button to add the default gateway entry.
11. Click
<OK>
button twice to confirm and save your changes, and then close the Control Panel.
12. If prompted to restart your computer, click
<OK>
button to do so with the new settings.