


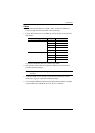
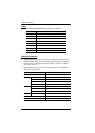
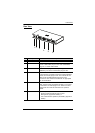
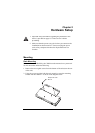


2. Hardware Setup
15
Installation
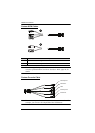
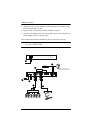
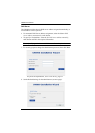
To install the CN8000, refer to the installation diagrams on the next two pages
(the numbers correspond to the numbers of the steps), and do the following:
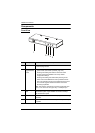
1. Use the Console cable provided with this package to connect the
CN8000’s Console port, to the local console keyboard, monitor and
mouse.
Note: 1. The Console cable comes with connectors for both PS/2 and USB
mice and keyboards – use the ones appropriate for your
installation.
2. You can use any combination of keyboard and mouse
connections. For example, you can use a PS/2 keyboard with a
USB mouse.
2. Use the KVM cable provided with this package to connect the CN8000’s
PC/KVM port, to the keyboard, video and mouse ports of the server, or
KVM switch’s port or KVM cable that you are installing.
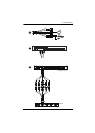
Note: 1. The diagram shows a connection to a KVM switch with PS/2
mouse and keyboard ports using a PS/2 KVM cable set. The
CN8000 can also connect to a server or KVM switch that uses a
USB connection by using a USB KVM cable set. See Cables,
page 7, for cable option information.
2. If you are using a PS/2 configuration KVM cable, refer to
page 184 for mouse pointer synchronization information.
3. If you are using a USB configuration KVM cable, see Mouse
DynaSync Mode, page 98, for mouse pointer synchronization
information.
4. The CN8000’s virtual media features may not be supported,
depending on the functionality of the cascaded KVM switch (see
Supported KVM Switches, page 186).
3. (Optional) If you want to use the virtual media function (see Virtual
Media, page 91), use the USB 2.0 Virtual Media Cable provided with this
package to connect a USB port on the server to the CN8000's Virtual
Media port.
4. (Optional) If you want to connect a PON device for remote power
management, plug its cable into the PON port.